23
Oct
Sebelum halloween tiba, tidak ada salahnya untuk membuat kerajinan tangan bersama anak, selain membuat anak makin kreatif tentunya akan menambah quality time bersama anda
 This materials list contains affiliate links for products I recommend.
•Plastic Trick or Treat Pumpkin
•Rope
•Tan Yarn
This materials list contains affiliate links for products I recommend.
•Plastic Trick or Treat Pumpkin
•Rope
•Tan Yarn •Light Colored Duct Tape
•Masking Tape
•Black Top Hat
•Black Sunglasses
•Scissors
•Hot Glue and Glue Gun
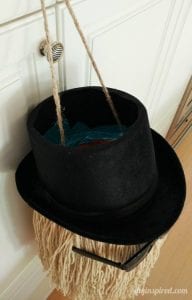
Cut off the existing black plastic handle on the pumpkin. Replace it with rope. Measure it, depending on the height of your child.
•Light Colored Duct Tape
•Masking Tape
•Black Top Hat
•Black Sunglasses
•Scissors
•Hot Glue and Glue Gun
Cut off the existing black plastic handle on the pumpkin. Replace it with rope. Measure it, depending on the height of your child.
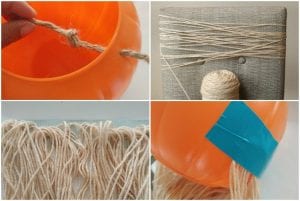 Next, unwind the spool of yarn around a chair back several times. Pull it off and cut only one end.
Lay out a piece of duct tape about 10” long. Lay the looped end of the yarn onto the duct tape.
Next, unwind the spool of yarn around a chair back several times. Pull it off and cut only one end.
Lay out a piece of duct tape about 10” long. Lay the looped end of the yarn onto the duct tape.
 Tape it around the mid-section of the pumpkin.
Repeat these steps and do the other side.
Tape it around the mid-section of the pumpkin.
Repeat these steps and do the other side.
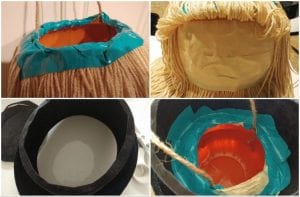 Note: I happen to have blue duct tape, so that’s what I used. I would recommend choosing a light colored duct tape so that it doesn’t show through the yarn.
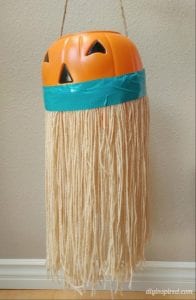
Repeat the steps above again, but in shorter strips of duct tape. This time, tape them around the rim of the pail.
Note: I happen to have blue duct tape, so that’s what I used. I would recommend choosing a light colored duct tape so that it doesn’t show through the yarn.
Repeat the steps above again, but in shorter strips of duct tape. This time, tape them around the rim of the pail.
 Next, lift up the first layer and cover the face with masking tape. This will help hide the face behind the yarn. For mine, I also covered the blue duct tape with masking tape.
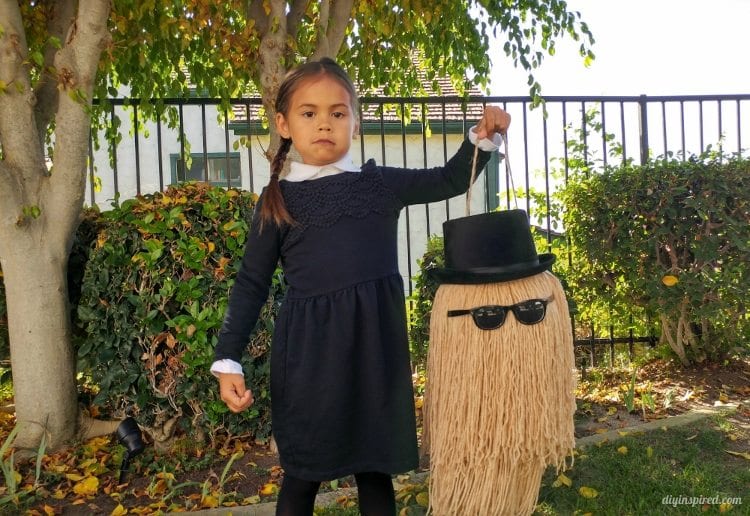
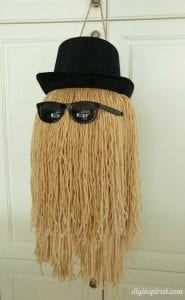 Cut the top off of the top hat. Place it on top of the pumpkin allowing the rope to come through. It will fit snuggly on the pumpkin. Use duct tape to tape the hat to the pumpkin as shown.
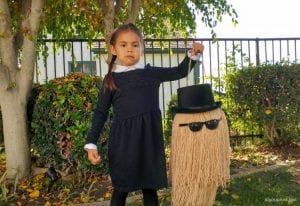
Source Article : https://www.diyinspired.com/cousin-diy-trick-treat-pail/ [ ... ]
Cut the top off of the top hat. Place it on top of the pumpkin allowing the rope to come through. It will fit snuggly on the pumpkin. Use duct tape to tape the hat to the pumpkin as shown.
Source Article : https://www.diyinspired.com/cousin-diy-trick-treat-pail/ [ ... ]
Read More
This materials list contains affiliate links for products I recommend.
•Plastic Trick or Treat Pumpkin
•Rope
•Tan Yarn
•Light Colored Duct Tape
•Masking Tape
•Black Top Hat
•Black Sunglasses
•Scissors
•Hot Glue and Glue Gun
Cut off the existing black plastic handle on the pumpkin. Replace it with rope. Measure it, depending on the height of your child.
Next, unwind the spool of yarn around a chair back several times. Pull it off and cut only one end.
Lay out a piece of duct tape about 10” long. Lay the looped end of the yarn onto the duct tape.
Tape it around the mid-section of the pumpkin.
Repeat these steps and do the other side.
Note: I happen to have blue duct tape, so that’s what I used. I would recommend choosing a light colored duct tape so that it doesn’t show through the yarn.
Repeat the steps above again, but in shorter strips of duct tape. This time, tape them around the rim of the pail.
Next, lift up the first layer and cover the face with masking tape. This will help hide the face behind the yarn. For mine, I also covered the blue duct tape with masking tape.
Cut the top off of the top hat. Place it on top of the pumpkin allowing the rope to come through. It will fit snuggly on the pumpkin. Use duct tape to tape the hat to the pumpkin as shown.
Source Article : https://www.diyinspired.com/cousin-diy-trick-treat-pail/ [ ... ] 

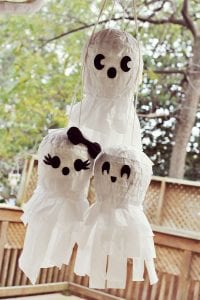 Supplies: balloon, liquid corn starch, strips of newspaper. And for decorating the piñata after it dries, you will need white paint, tissue paper, black felt, and Elmer’s glue.
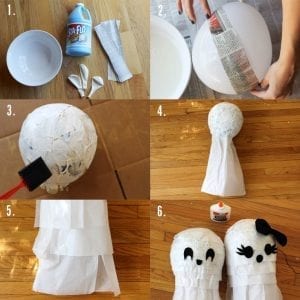 2. Blow up your balloon and begin dipping strips of newspaper in liquid corn starch. Lay the strips on the surface of the balloon (you want the strips wet, but not soggy). Continue doing this until the balloon is totally covered. 3. After your balloon has been drying for about a day, cover the newspaper in a coat of white paint. This will hide any newsprint that may want to peek out. After the paint dries, carefully pop the balloon inside of the newspaper.
4. Begin glueing tissue paper around the base of the balloon. You may need more than on piece to make it wrap all the way around.
5. After you have glued 3 or 4 long tiers on, start back down by the base of the balloon and begin the same process with thinner strips of tissue paper. You will need a large circle to finish off the top. 5. When all of the strips have been glued down, go back to your long layers at the bottom and cut them into fringe.
6. Cut faces shapes out of felt and glue them down. You’re all done!
2. Blow up your balloon and begin dipping strips of newspaper in liquid corn starch. Lay the strips on the surface of the balloon (you want the strips wet, but not soggy). Continue doing this until the balloon is totally covered. 3. After your balloon has been drying for about a day, cover the newspaper in a coat of white paint. This will hide any newsprint that may want to peek out. After the paint dries, carefully pop the balloon inside of the newspaper.
4. Begin glueing tissue paper around the base of the balloon. You may need more than on piece to make it wrap all the way around.
5. After you have glued 3 or 4 long tiers on, start back down by the base of the balloon and begin the same process with thinner strips of tissue paper. You will need a large circle to finish off the top. 5. When all of the strips have been glued down, go back to your long layers at the bottom and cut them into fringe.
6. Cut faces shapes out of felt and glue them down. You’re all done!

 Source Article : https://abeautifulmess.com/2012/10/ghost-family-pinata-party.html [ ... ]