
20
Feb
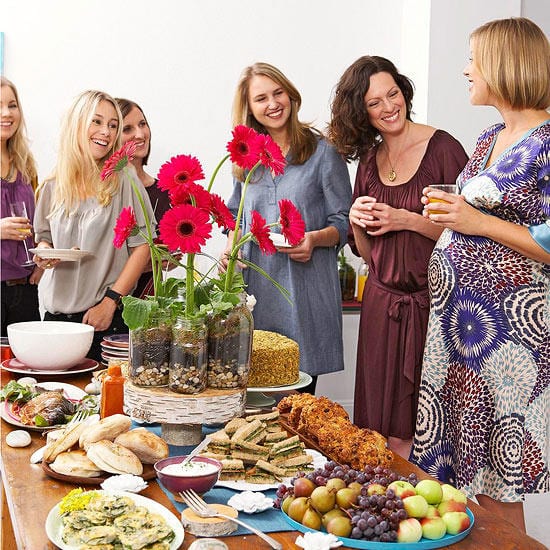
Nggak perlu bingung untuk bikin Baby Shower sendiri, gunakan barang-barang
yang ada disekitar kita, selain bisa hemat, tidak makan waktu, kamu juga bisa bikin
sesuai yang kamu inginkan dan nyoba sesuatu yang unik juga. Coba yuk!
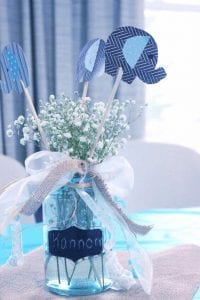
BABY'S BREATH CENTERPIECE IDEA FOR A BABY SHOWER
image source: Pinterest - original source unknown
For simple and adorable, DIY baby shower centerpiece ideas (for a boy or girl) idea, fill a mason jar with baby's breath and add embellishments to match the theme of the baby shower. Using colored paper or scrapbook paper, you can use baby-themed paper punches and punch out cute shapes such as onesies, bottles, teddy bears, elephants or anything that matches the shower theme. Attach them to wooden skewers or dowels, poke into the jar. So cute! You can also turn this into a fun little baby shower game. Put a sticker on the bottom of one plate or glass at each table - the guests who get the stickers on their plates, win the centerpiece at their table! Shopping List:- Paper Elephant Cut-Outs
- Wooden Dowels
- Mason Jars
- Chalkboard Labels
- Baby's Breath
- Burlap Ribbon
WOODLAND MINI DIAPER CENTERPIECES
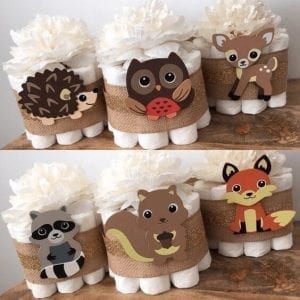
image source
These baby shower table decorations are adorable! And so easy to make! Simply roll 10 diapers and secure them with clear tape. Then wrap a think ribbon or burlap around them. add cute embellishments to match your theme! Give to the mom-to-be after the baby shower is over so she can use the diapers for the new baby. Shopping List:- Diapers
- Burlap Ribbon
- Woodland Cut-Outs
- Fluffy Flower Toppers
SUGAR COOKIE BOUQUET
- Using your favorite sugar cookie recipe, cut dough into cute "baby themed" shapes and place a Popsicle or lollipop stick into the bottom of each one before baking.
- When done baking and cooled, frost with frosting to match the baby shower theme.
- Tie ribbon around each cookie stick for added cuteness.
- Place some floral foam in the bottom of a cute pot or mason jar.
- Insert the cookies into the foam. Cover the foam with jelly bellies, pastel M&M's, Easter grass, shredded paper, etc.
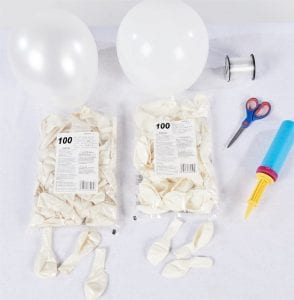 •1package of 12-inch white latex balloons 72 count
•1package of 12-inch white pearl latex balloons 72 count
•1 balloon pump
•Scissors
•1 roll fishing line
•1package of 12-inch white latex balloons 72 count
•1package of 12-inch white pearl latex balloons 72 count
•1 balloon pump
•Scissors
•1 roll fishing line
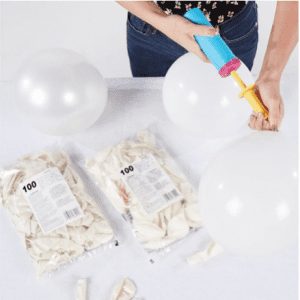 Inflate several white and white pearl balloons with a balloon pump.
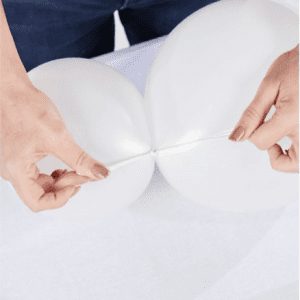 Pair two balloons together and tie their ends to each other. Repeat
this step with the rest of the inflated balloons.
Pair two balloons together and tie their ends to each other. Repeat
this step with the rest of the inflated balloons.
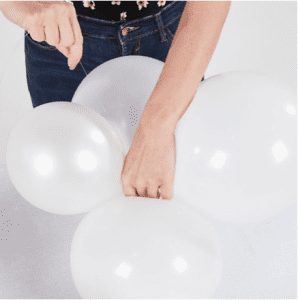 Take two sets of balloon pairs and attach them to each other with
fishing line.
Take two sets of balloon pairs and attach them to each other with
fishing line.
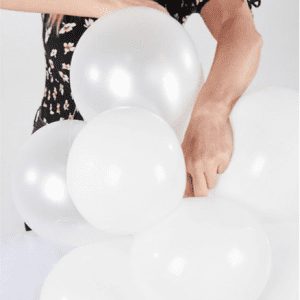 As you continue to attach more balloon pairs to the cluster, the DIY
balloon cloud will start taking shape.
As you continue to attach more balloon pairs to the cluster, the DIY
balloon cloud will start taking shape.
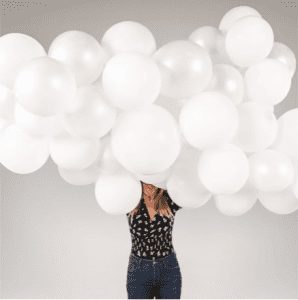 When the DIY balloon cloud reaches the desired size, hang from the
ceiling with fishing line. Alternatively, inflate balloons with helium to
create a floating cloud for display indoors or outside. For a special
touch, add circle dot garlands to the bottom of the cloud.
When the DIY balloon cloud reaches the desired size, hang from the
ceiling with fishing line. Alternatively, inflate balloons with helium to
create a floating cloud for display indoors or outside. For a special
touch, add circle dot garlands to the bottom of the cloud.
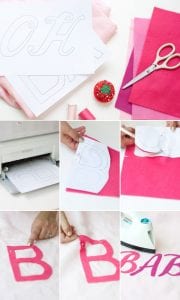
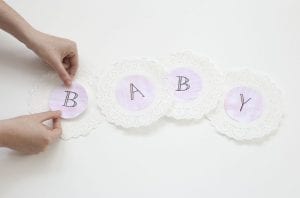
 For this craft, you will need the following supplies:
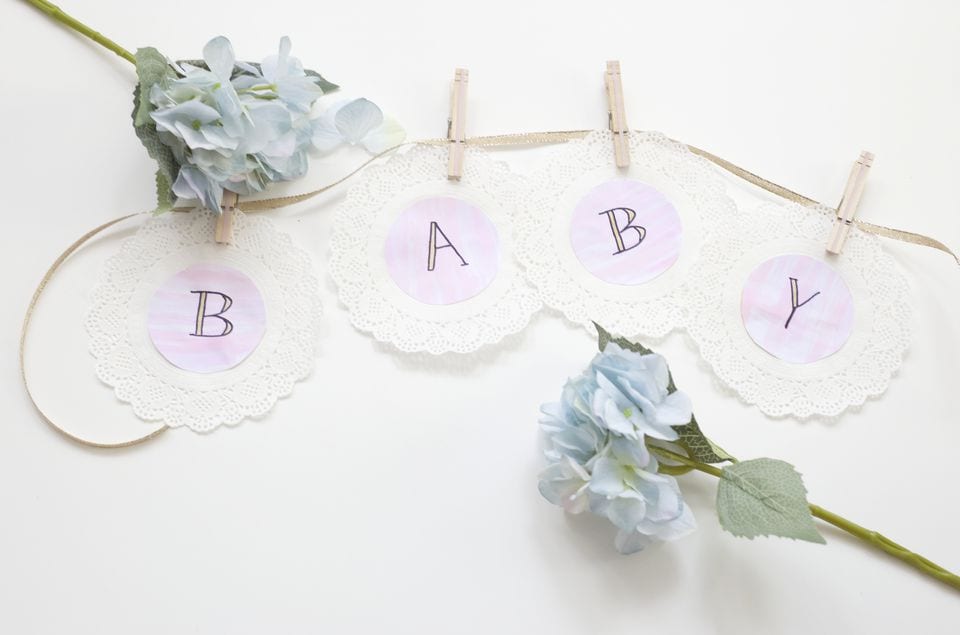
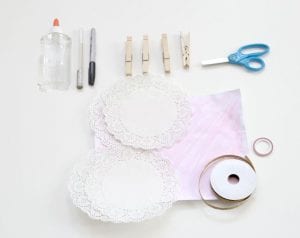 Scissors
Craft paper or decorated card stock
Doilies (one for each letter)
Pens for lettering or alphabet stamps
Craft glue
Clothespins
Washi tape
Ribbon
Your banner can simply read “Baby,” or perhaps you want to try a phrase such as “It’s a Girl!” or “It’s a Boy!” Now is the time to figure out just what your banner should say.
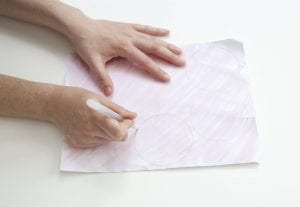
If you are making the banner for a friend and you know the baby’s sex, feel free to use colors to fit the baby shower. You can use pre-decorated craft paper or make your own with card stock and watercolor paints.
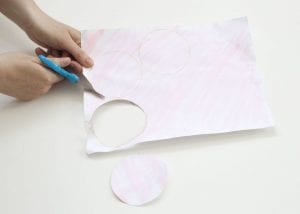
You will need one doily and one circle of card stock per letter. The circles you draw should measure to fit the inside of the doily. For the doilies featured in this project, the circles had a diameter of 3-1/2 inches.
Use scissors to cut out the circles of your craft paper or decorated card stock. For our decorated paper, we used watercolors to paint the background.
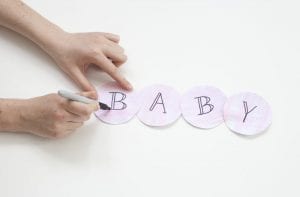
If you are good at calligraphy, now is the time to show off your fancy letter work! Use a pen or marker in a bold or contrasting color to write one letter on each of your circles. For our banner, we wrote the letters by hand without a stencil.
If you’re letter work needs assistance: Use a computer to find a font you feel comfortable tracing and print out the letters. Having a guide will help you achieve the look of a stamp or professional quality.
Once your craft paper circles have been lettered, use glue (white, clear, or a glue-stick) to adhere them to the center of your doily. Allow to dry.
Tip: Use a thin layer of glue so that the delicate doily paper doesn’t get saturated and tear.
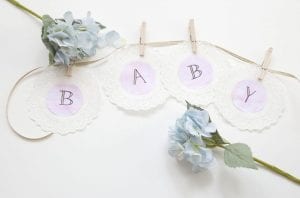
Do you want to hang your banner in a doorway, over a fireplace mantel, on a wall, or in a nursery? The length of the ribbon you use to hang your banner will depend on where you want it to go. Cut your ribbon accordingly.
You will need to use one clothespin per letter to attach your doilies to the ribbon. If you want to add something extra to your banner, feel free to decorate the clothespins. We recommend using washi tape or acrylic paint to add another pop of color, or a strip of lace to achieve a sweet-as-can-be look. It can be as subtle or bold as you want!
Scissors
Craft paper or decorated card stock
Doilies (one for each letter)
Pens for lettering or alphabet stamps
Craft glue
Clothespins
Washi tape
Ribbon
Your banner can simply read “Baby,” or perhaps you want to try a phrase such as “It’s a Girl!” or “It’s a Boy!” Now is the time to figure out just what your banner should say.
If you are making the banner for a friend and you know the baby’s sex, feel free to use colors to fit the baby shower. You can use pre-decorated craft paper or make your own with card stock and watercolor paints.
You will need one doily and one circle of card stock per letter. The circles you draw should measure to fit the inside of the doily. For the doilies featured in this project, the circles had a diameter of 3-1/2 inches.
Use scissors to cut out the circles of your craft paper or decorated card stock. For our decorated paper, we used watercolors to paint the background.
If you are good at calligraphy, now is the time to show off your fancy letter work! Use a pen or marker in a bold or contrasting color to write one letter on each of your circles. For our banner, we wrote the letters by hand without a stencil.
If you’re letter work needs assistance: Use a computer to find a font you feel comfortable tracing and print out the letters. Having a guide will help you achieve the look of a stamp or professional quality.
Once your craft paper circles have been lettered, use glue (white, clear, or a glue-stick) to adhere them to the center of your doily. Allow to dry.
Tip: Use a thin layer of glue so that the delicate doily paper doesn’t get saturated and tear.
Do you want to hang your banner in a doorway, over a fireplace mantel, on a wall, or in a nursery? The length of the ribbon you use to hang your banner will depend on where you want it to go. Cut your ribbon accordingly.
You will need to use one clothespin per letter to attach your doilies to the ribbon. If you want to add something extra to your banner, feel free to decorate the clothespins. We recommend using washi tape or acrylic paint to add another pop of color, or a strip of lace to achieve a sweet-as-can-be look. It can be as subtle or bold as you want!
 Source Article : https://www.thesprucecrafts.com/diy-baby-shower-banner-4169501
[ ... ]
Source Article : https://www.thesprucecrafts.com/diy-baby-shower-banner-4169501
[ ... ]