
30
May
Ascension Day
Categories:
Inspiration
Di kutip dari sumber : https://www.officeholidays.com/countries/europe/ascension_day.php

 Muslim man praying during Ramadan | © terimakasih0/pixabay
 New moon | © Ponciano/pixabay
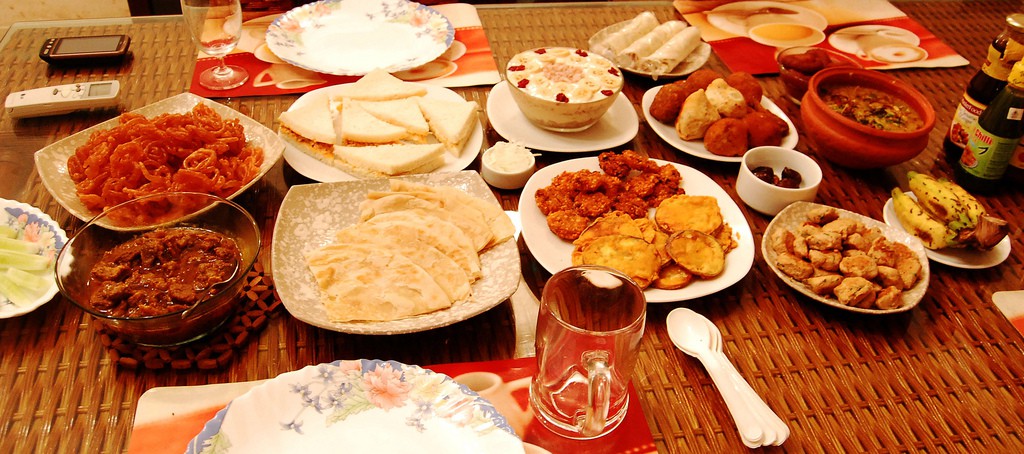 Feast | © raasiel/Flickr
 Prayer | © Hamed Saber/Flickr [cropped]
 Muslim family | © neildodhia/pixabay
 Little child | © ArmyAmber/pixabay
 Muslim woman | © wahyucurug/pixabay
 Eid al-Fitr in India | © Jordi Bernabeu Farrús/Flickr
 Everyone celebrating | © U.S. Embassy Tel Aviv/Flickr


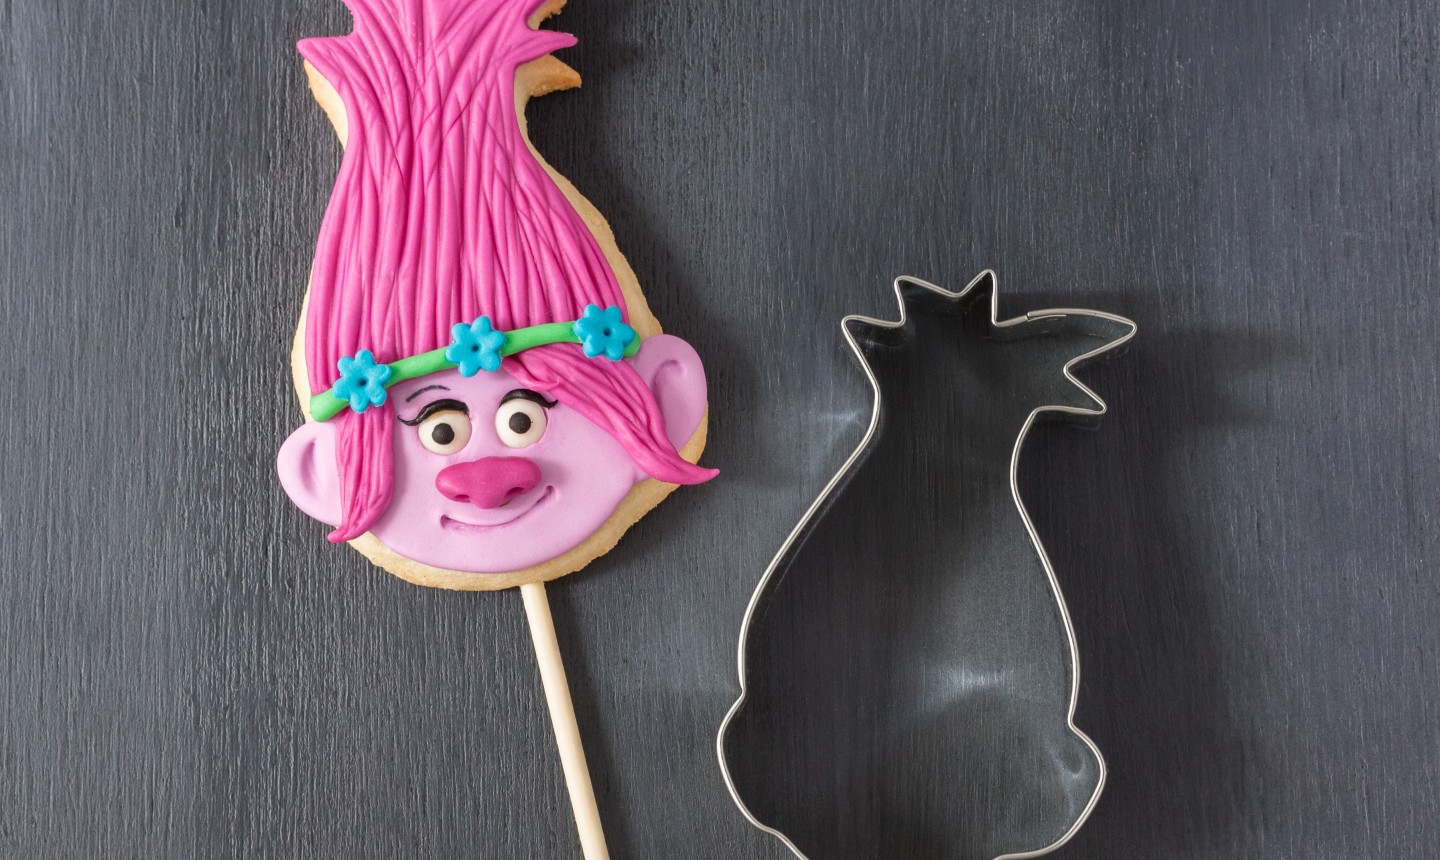
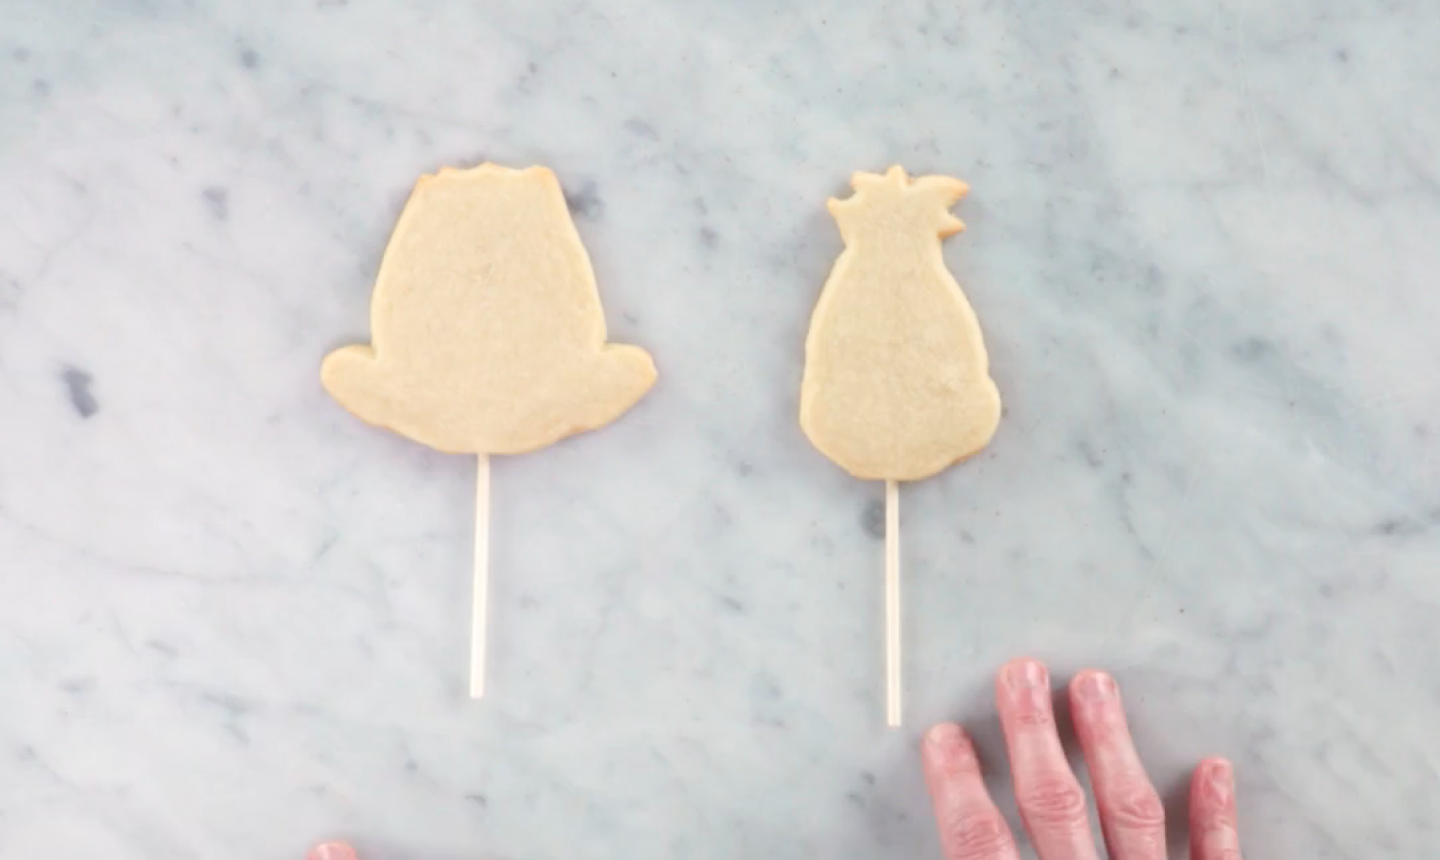 Before we can get decorating, we’ve got to have something to decorate. Mix together your desired batter, use the Trolls cookie cutter to shape the cookie, push the dowel halfway into the cookie and bake according to your recipe directions.
Pro tip: to make sure the dough keeps its shape, chill the batter thoroughly in the fridge before cutting out the shapes and baking.
Before we can get decorating, we’ve got to have something to decorate. Mix together your desired batter, use the Trolls cookie cutter to shape the cookie, push the dowel halfway into the cookie and bake according to your recipe directions.
Pro tip: to make sure the dough keeps its shape, chill the batter thoroughly in the fridge before cutting out the shapes and baking.
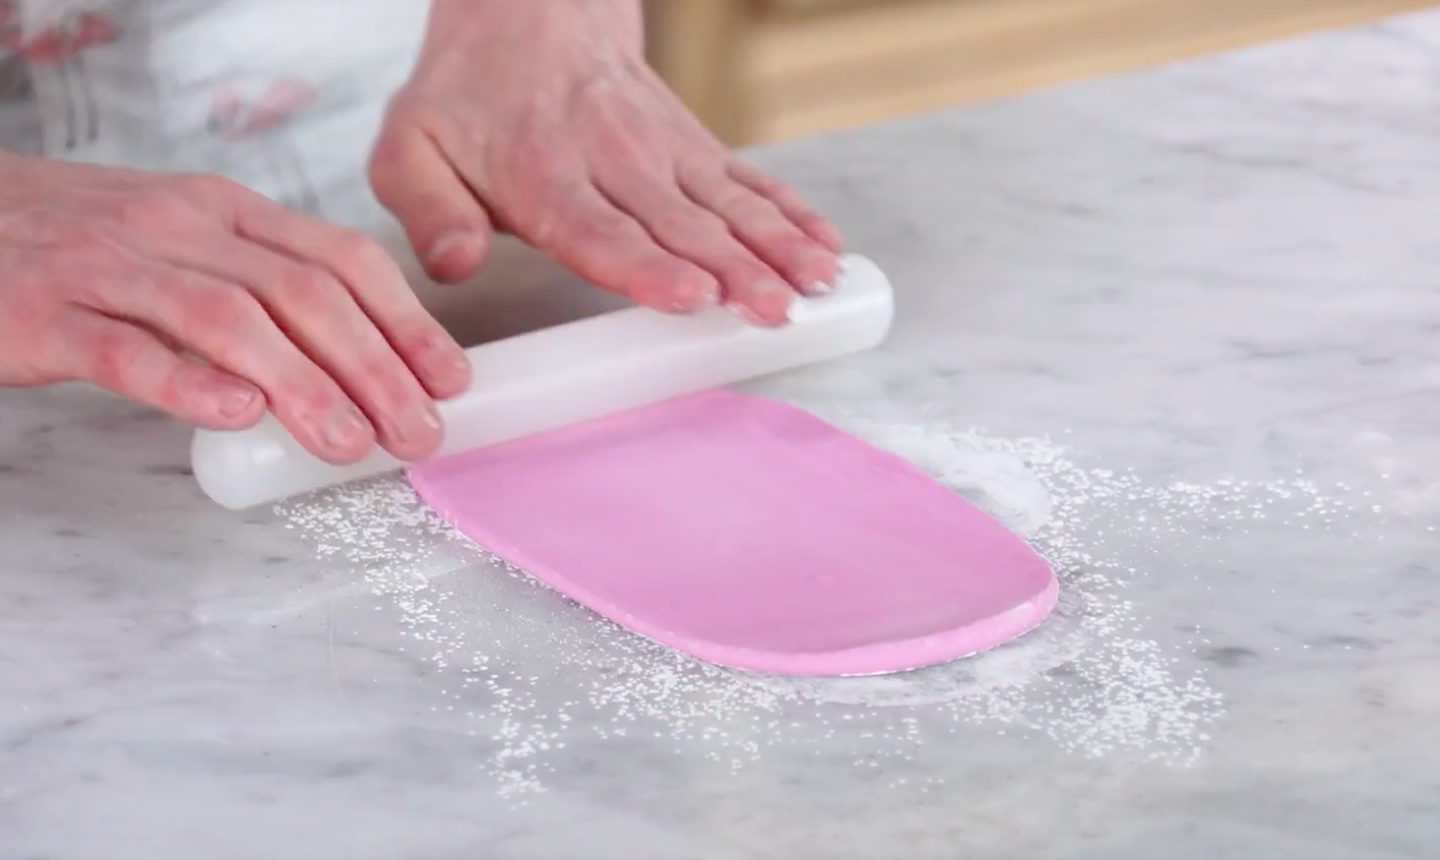 Knead the fondant against your workspace to make it soft and workable. Be sure to sprinkle a little bit of cornstarch before kneading so the fondant won’t stick to the surface. Once your fondant is soft and has some stretch, roll it out with a rolling pin until it’s about ⅛-inch thick.
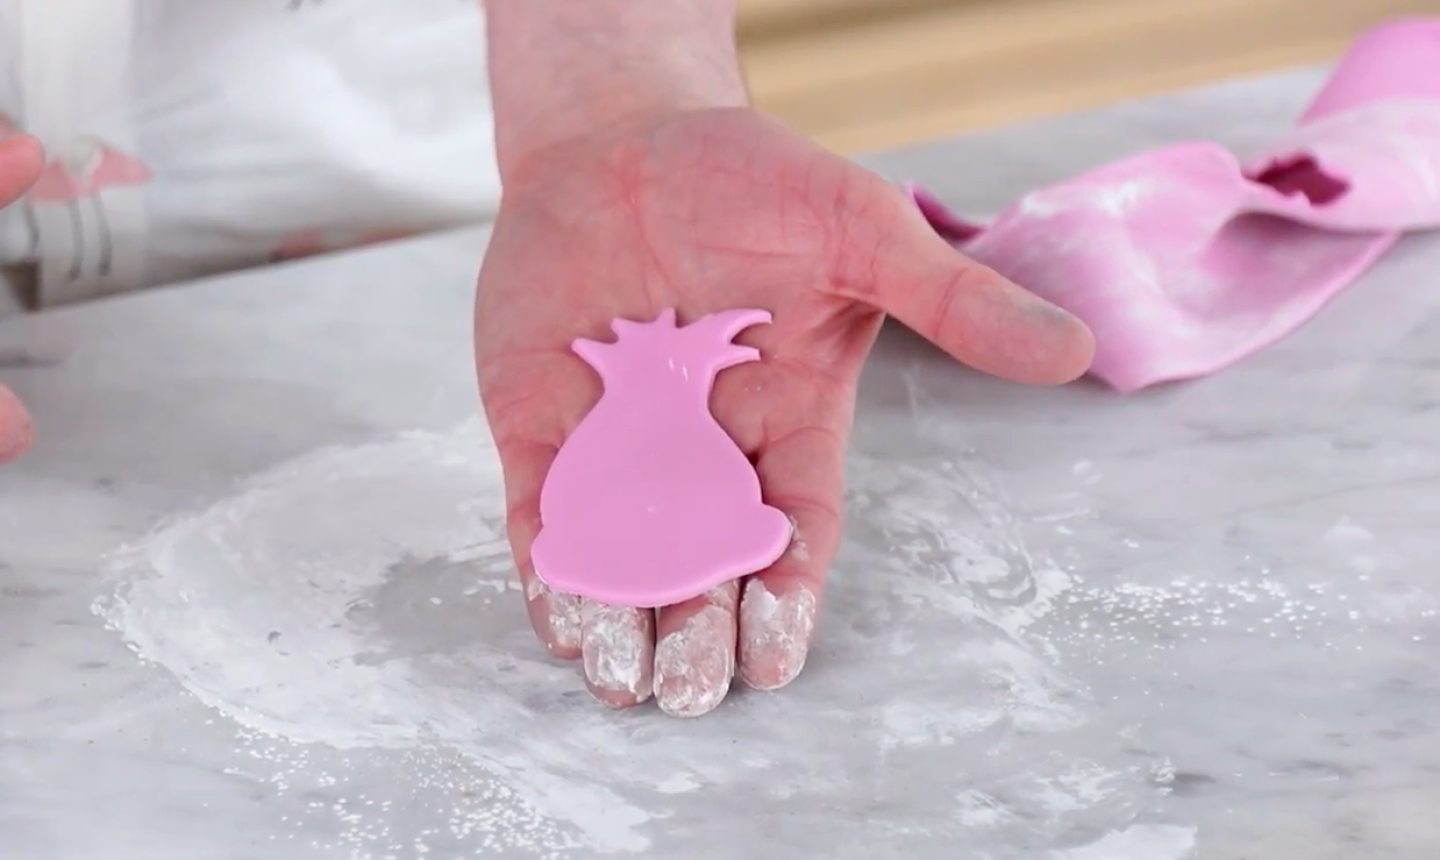 Use the same cookie cutter you used on your batter to cut the fondant into the shape of Poppy’s head.
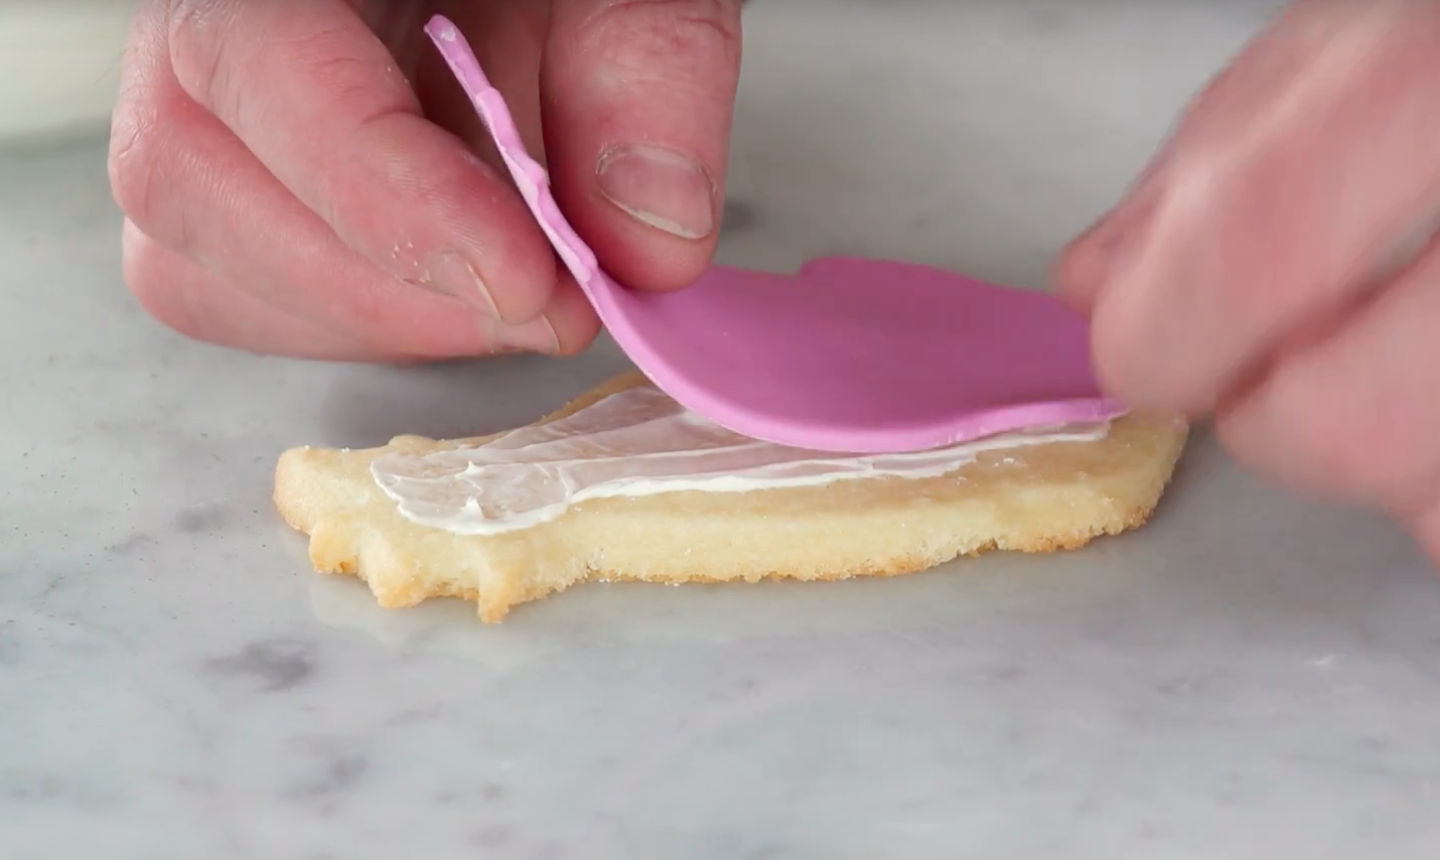 Brush a bit of water over the back side of your fondant cut-out. (Our photo shows a layer of buttercream here, but water does the job just fine.) Check with a finger to see that the fondant is tacky — that's how you'll know it's moist enough. Carefully lay the fondant Poppy on top of the cookie and gently push down with your fingers to make sure it seals on there securely.
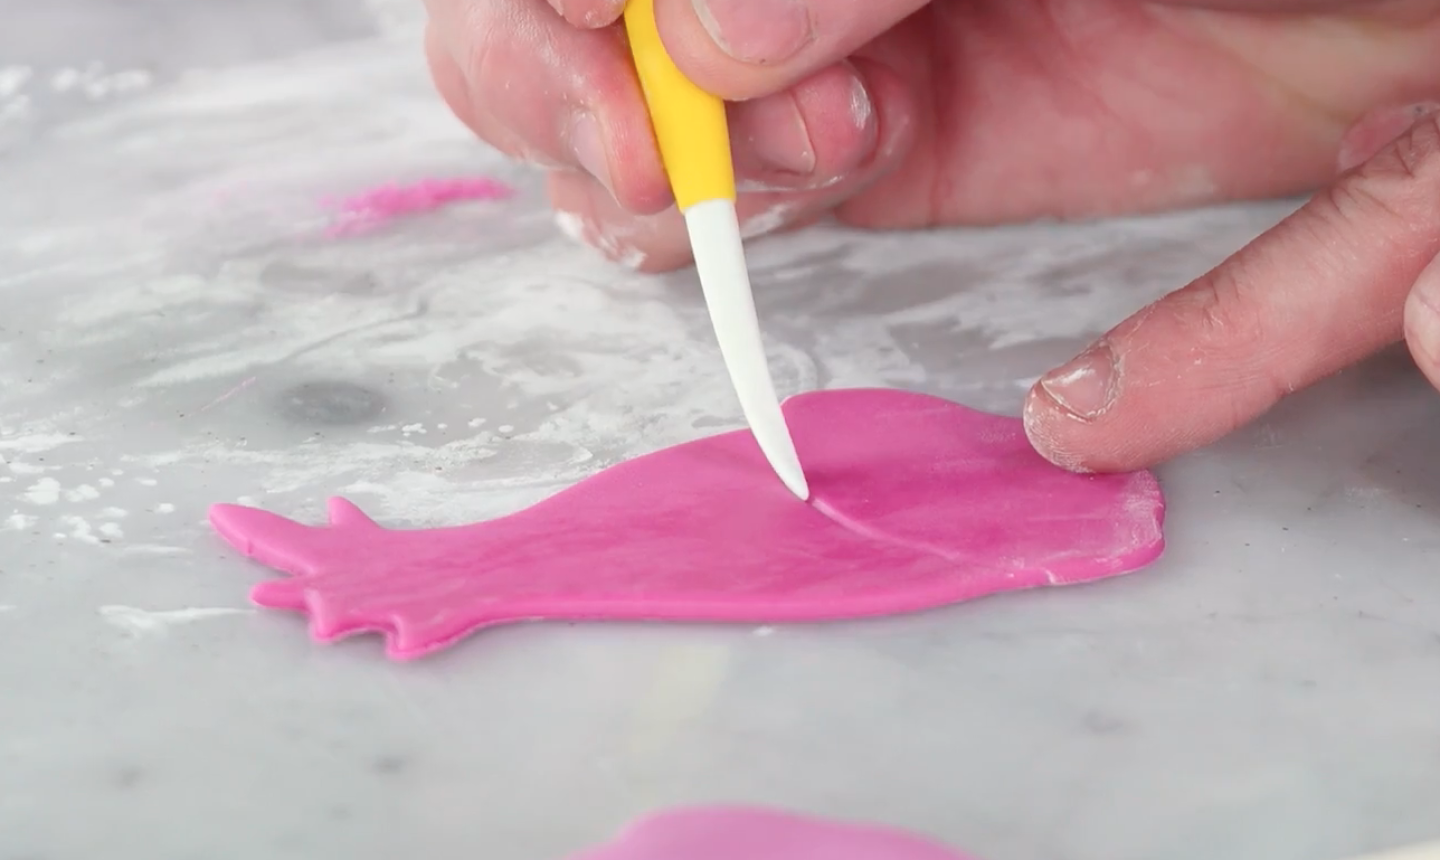 Crazy hair is a Trolls staple. To make some for your cookie, knead and roll a darker shade of pink fondant just like you did before. Once again, use the Poppy cookie cutter to get your shape. But this time, instead of placing the whole shape onto the cookie, use a dresden or other scoring tool to mark out her hair line and cut it out. An easy way to find the hair line: cut from ear to ear.
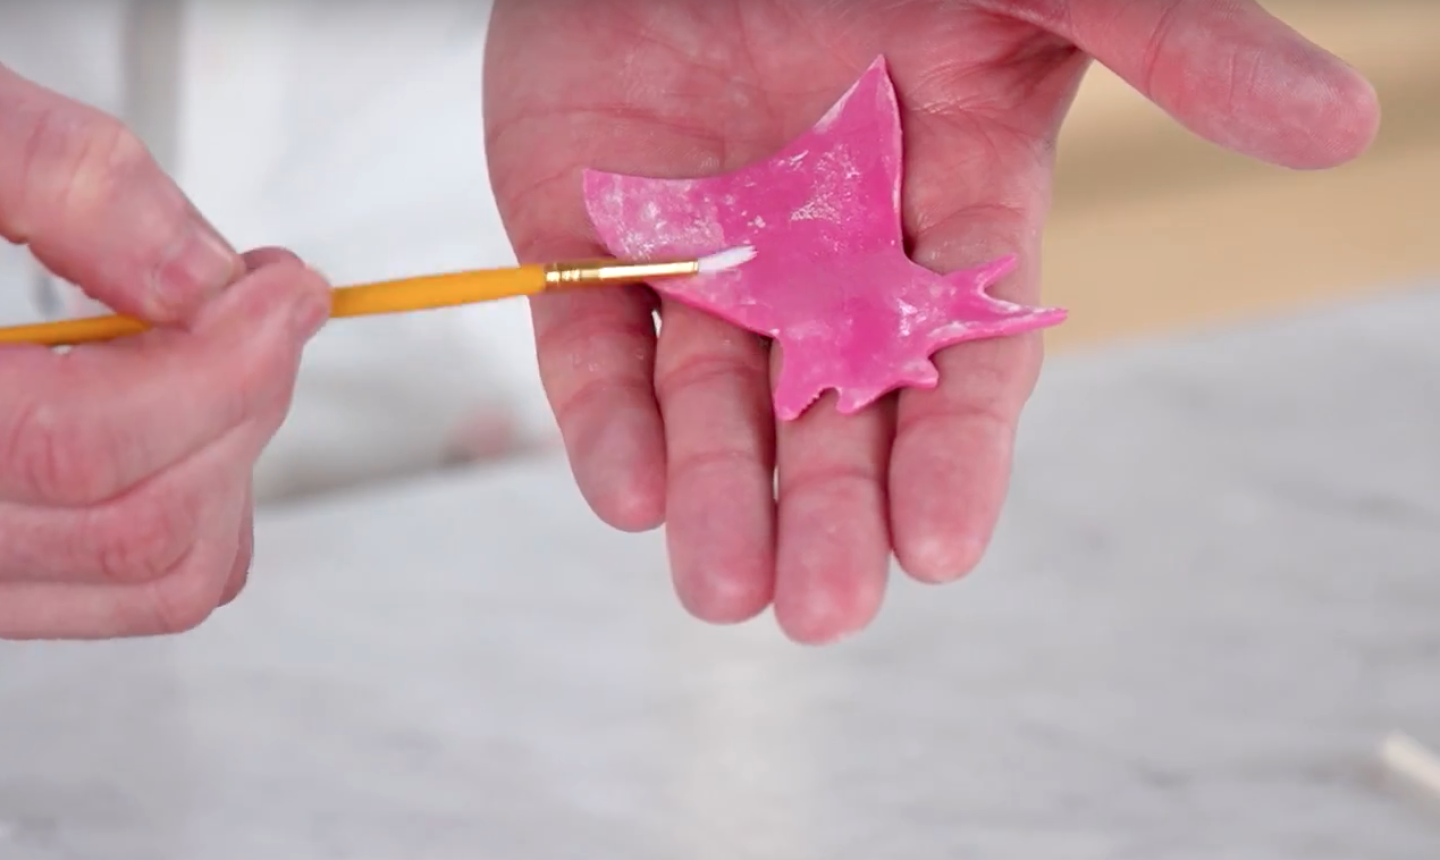 Use a small paint brush to apply a little bit of water to the back of her fondant hair piece and secure it to the top of your cookie.
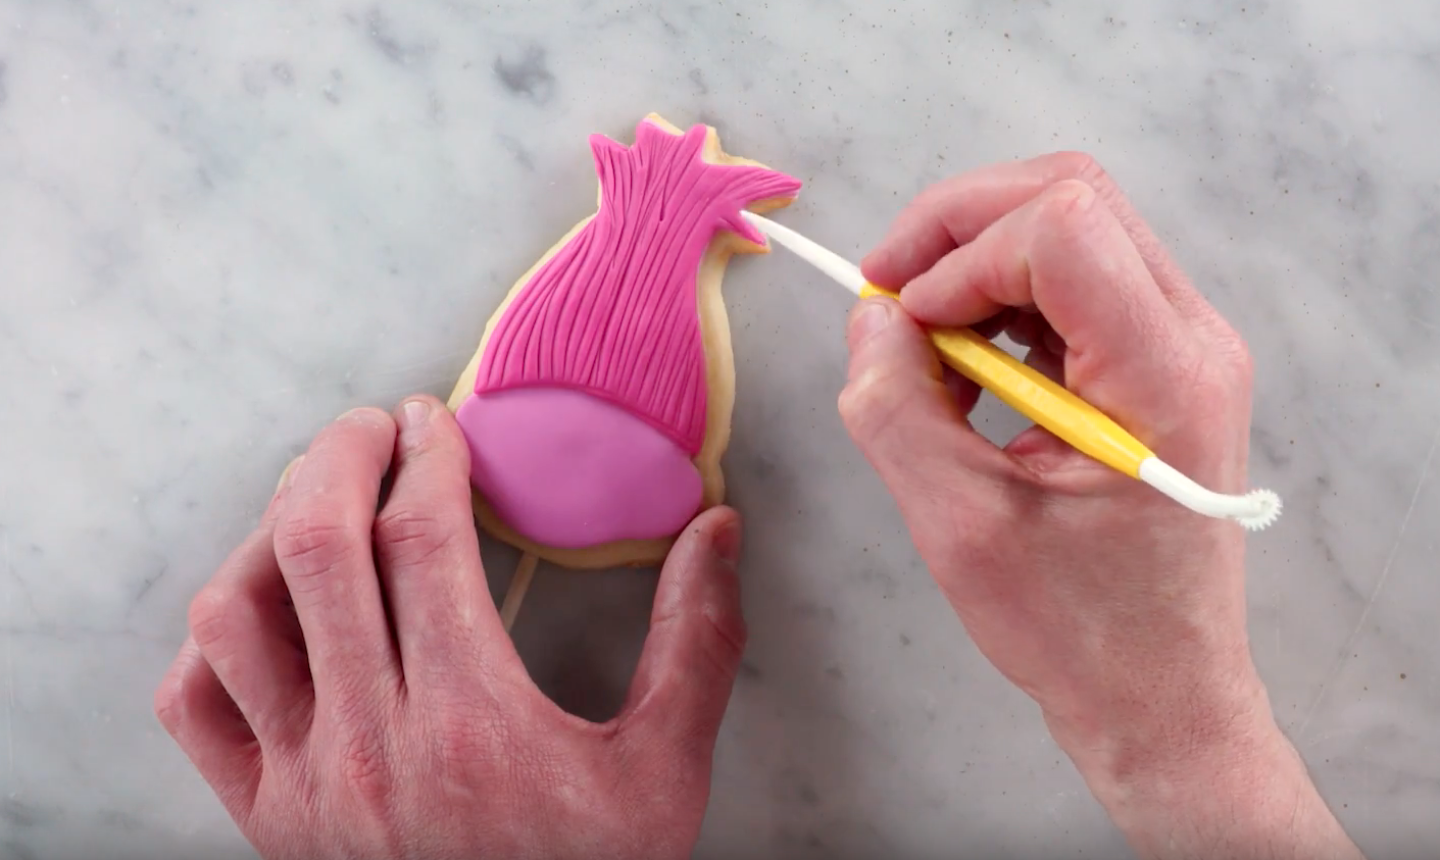 Pick your dresden tool back up! To add hair-like texture, simply sweep your tool from her hair line to the tip of the cookie to create long indents. Be sure to do this gently so you don’t cut through the fondant.
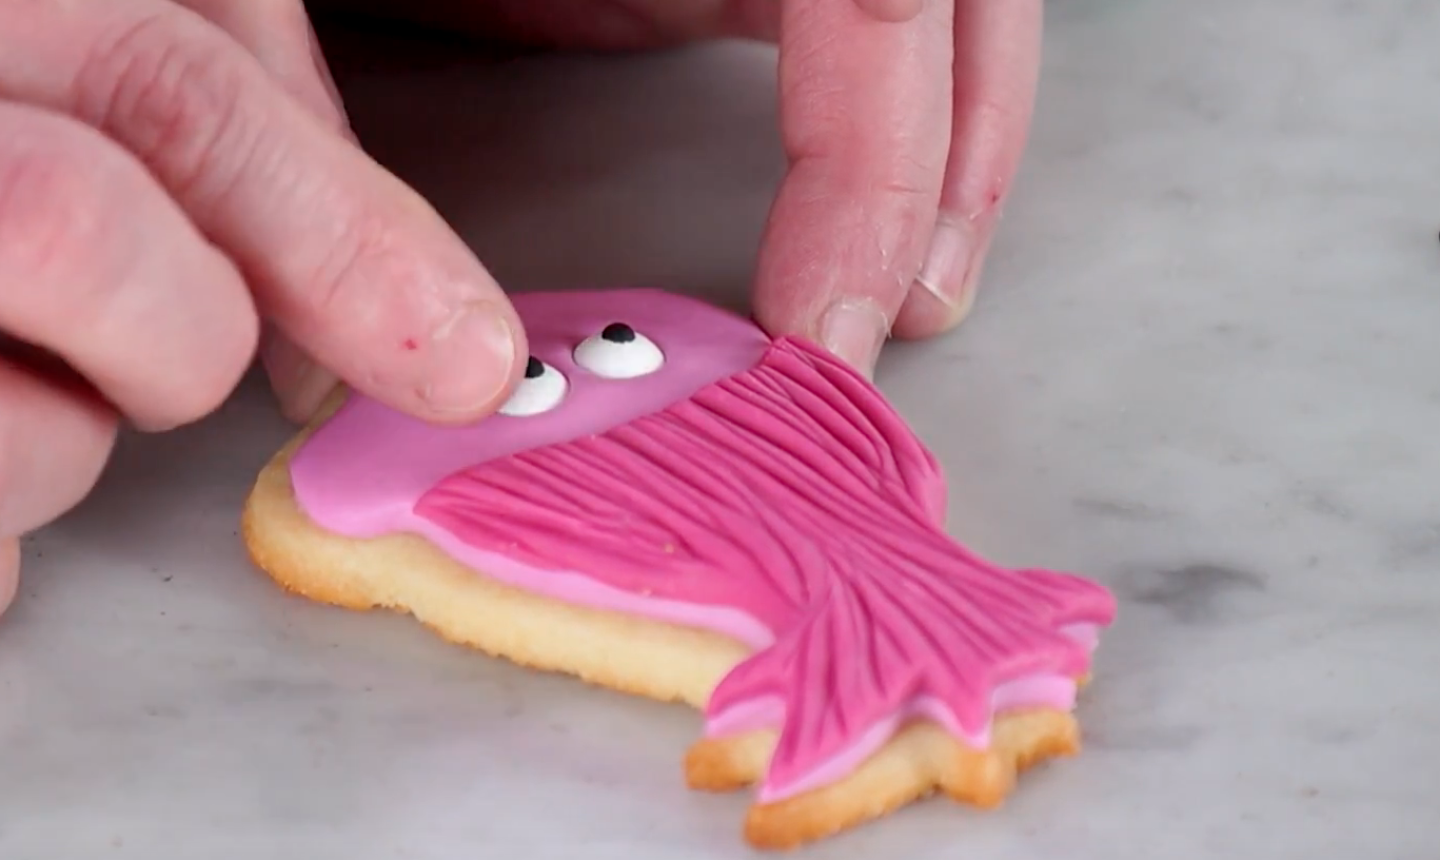 Now to make her cute face! When adding her eyes, be careful you leave enough room under the hair to place the eyelashes. Make things easy on yourself and use pre-made candy eyes. Press them down into her fondant face and smooth out any wrinkles in the fondant that appear.
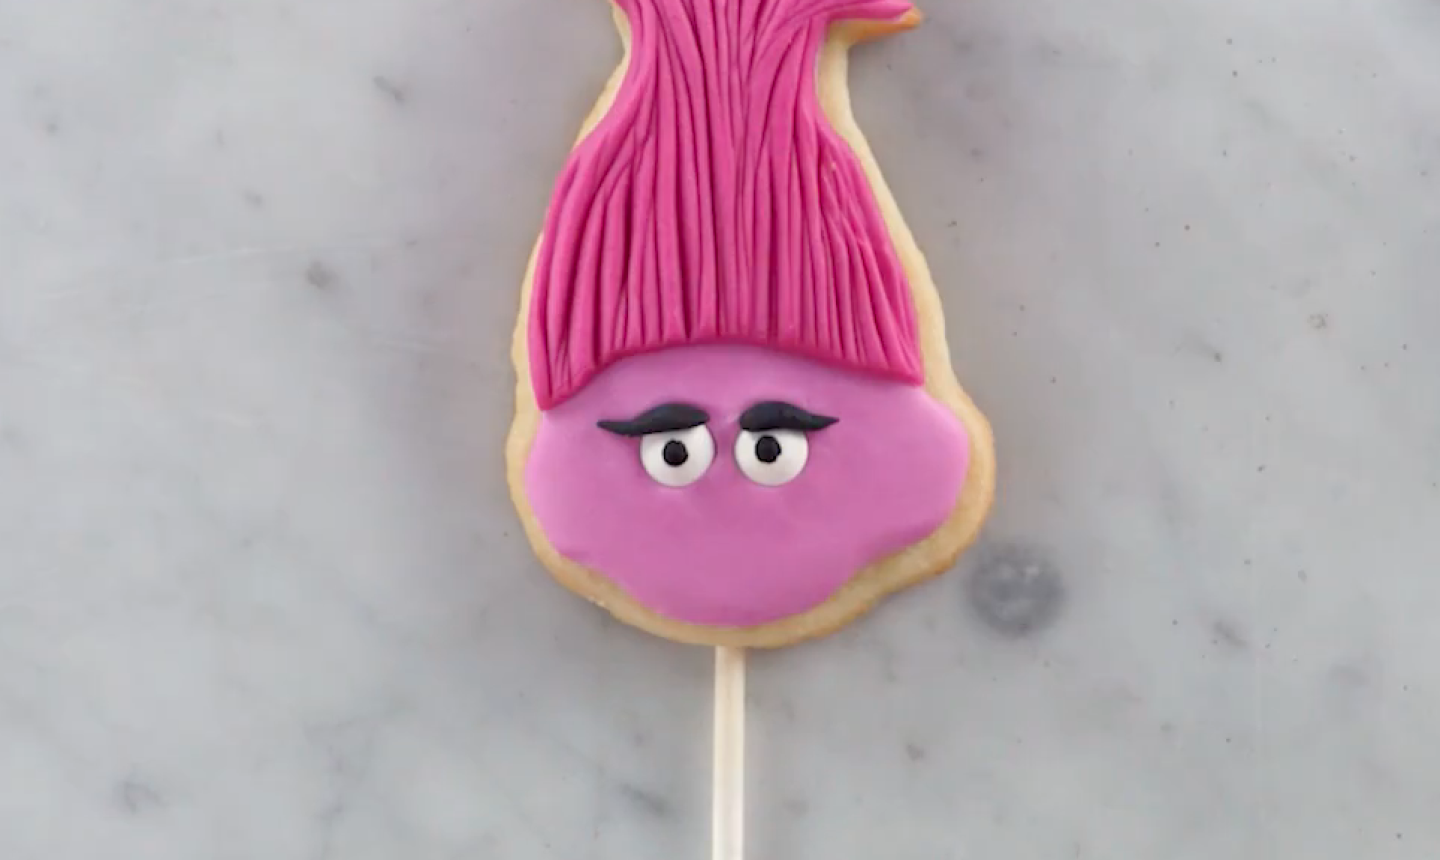 Roll tiny pieces of black fondant into a teardrop shape and set them aside for a few minutes to firm up. Once again, use water and a paint brush to wet above her eyes and secure the fondant lashes. Poppy now has her big, beautiful lashes!
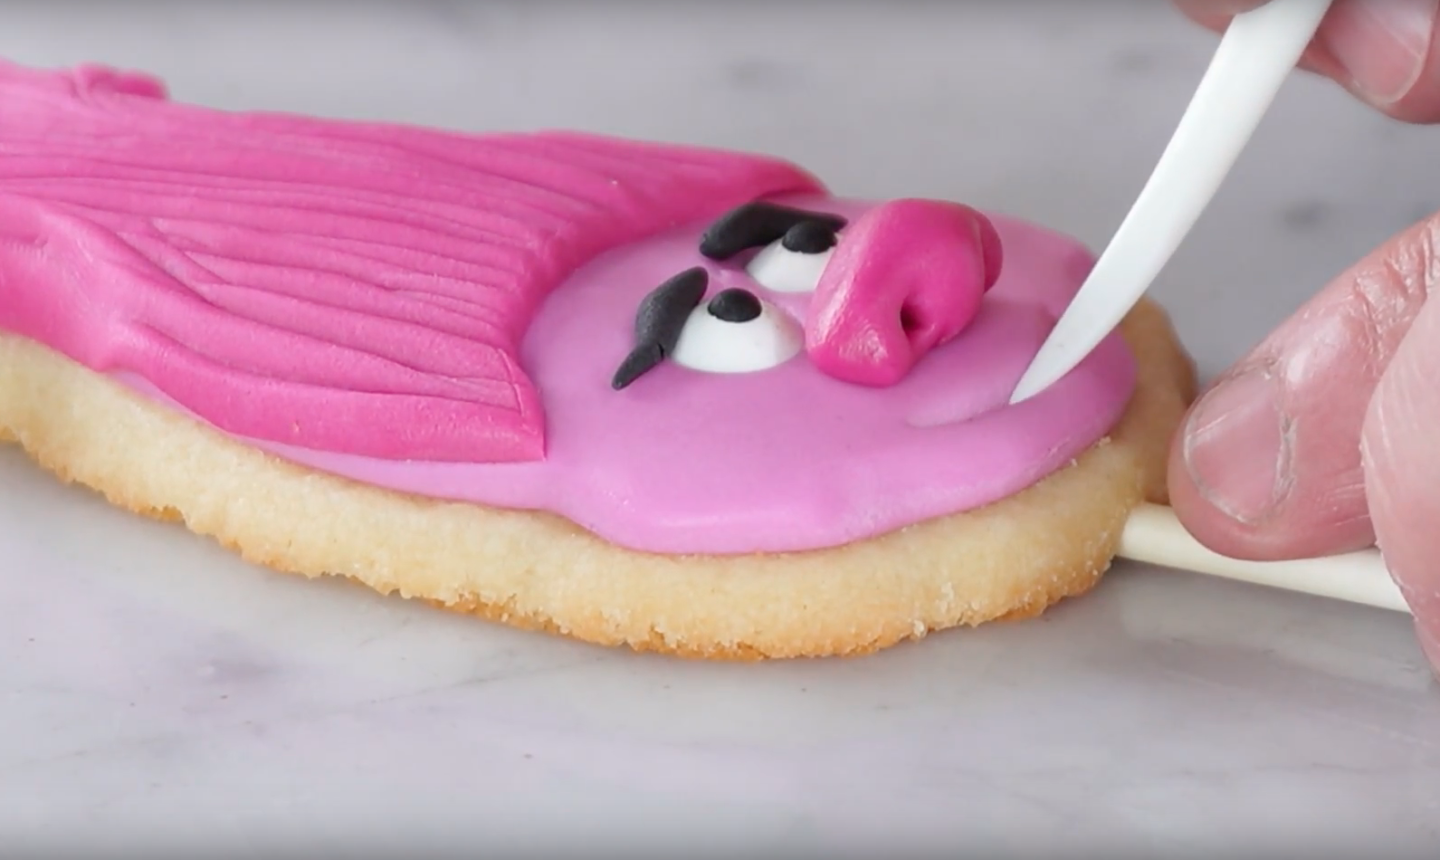 Using the same color fondant as Poppy’s hair, roll a small (but thick) oblong shape. Place it right below her eyes and use your dresden tool to create two nostrils. With the same tool, draw a smile under her nose, and detail her ears with simple lines.
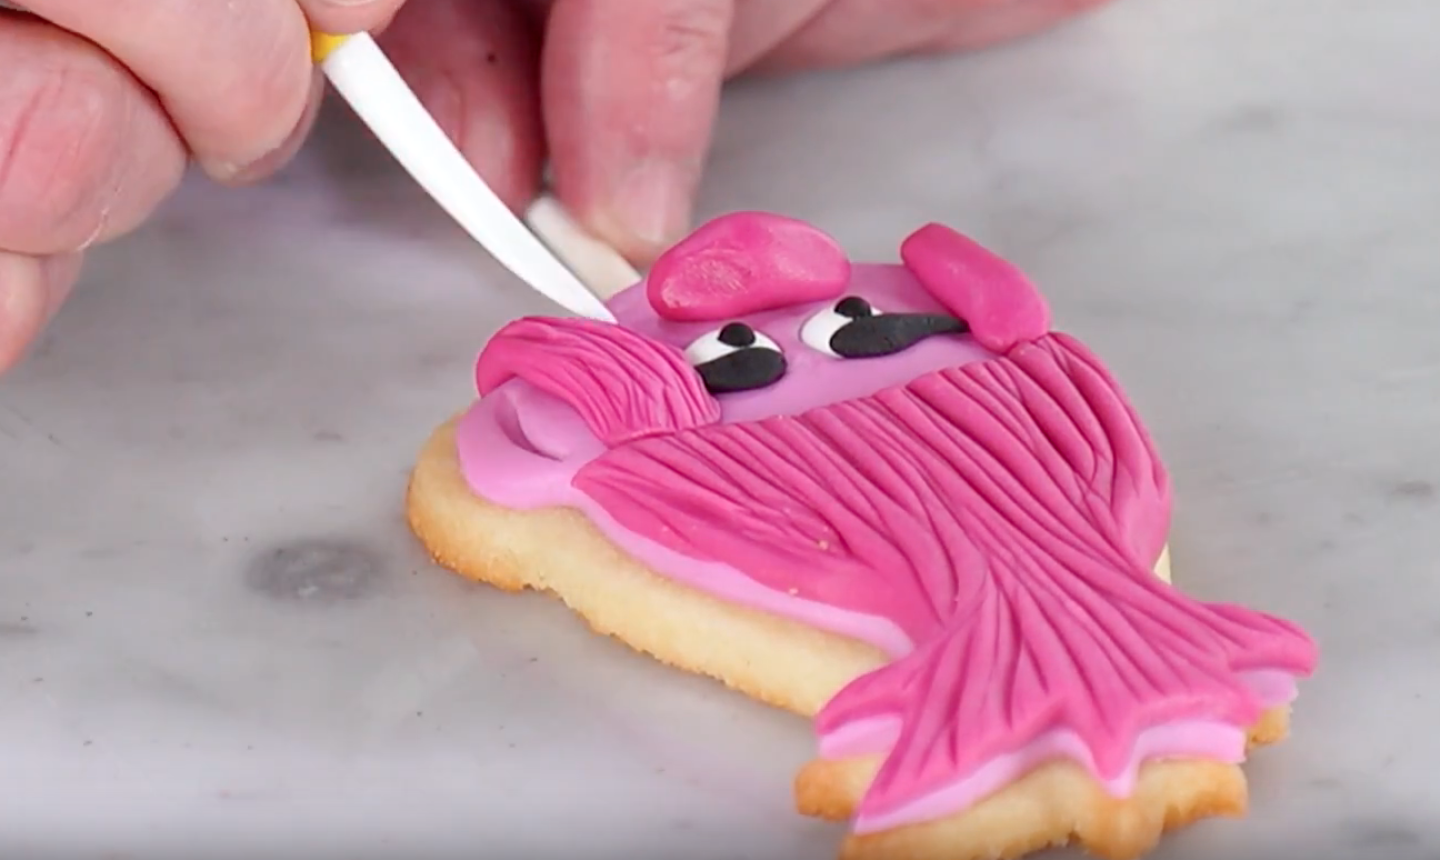 Not all of Poppy’s hair stands up on her head. Roll two pieces of the dark pink fondant into two cones and apply them to each side of her face. Texture these pieces just as you did with her main hair piece.
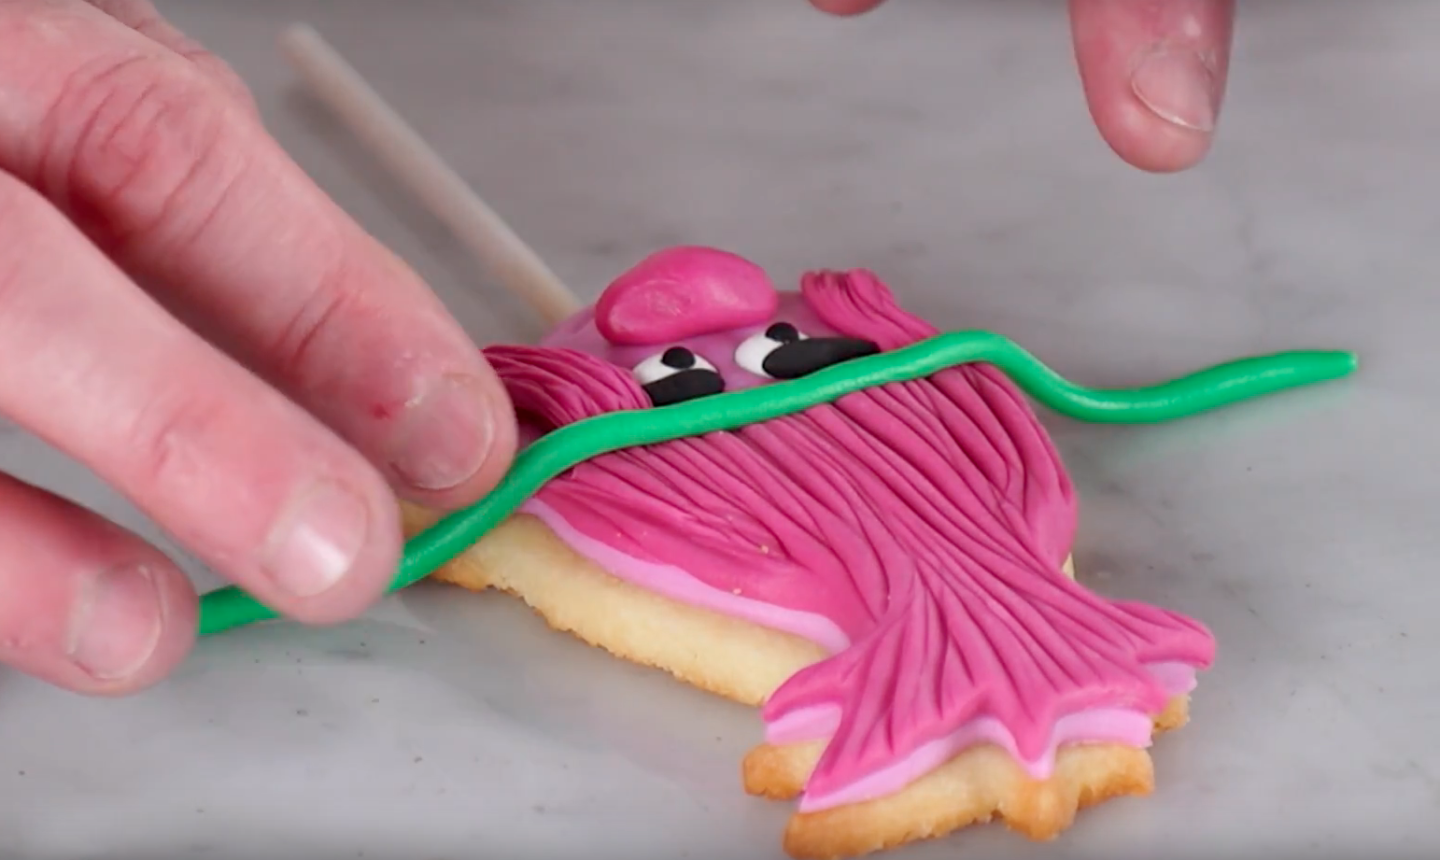 As any Trolls fan knows, Poppy loves all things happy and cute — including her flowery headband. Roll a piece of green gum paste into a skinny vine and glue it (yep, using water and a paint brush again!) across the edge of her hairline, cutting off any excess.
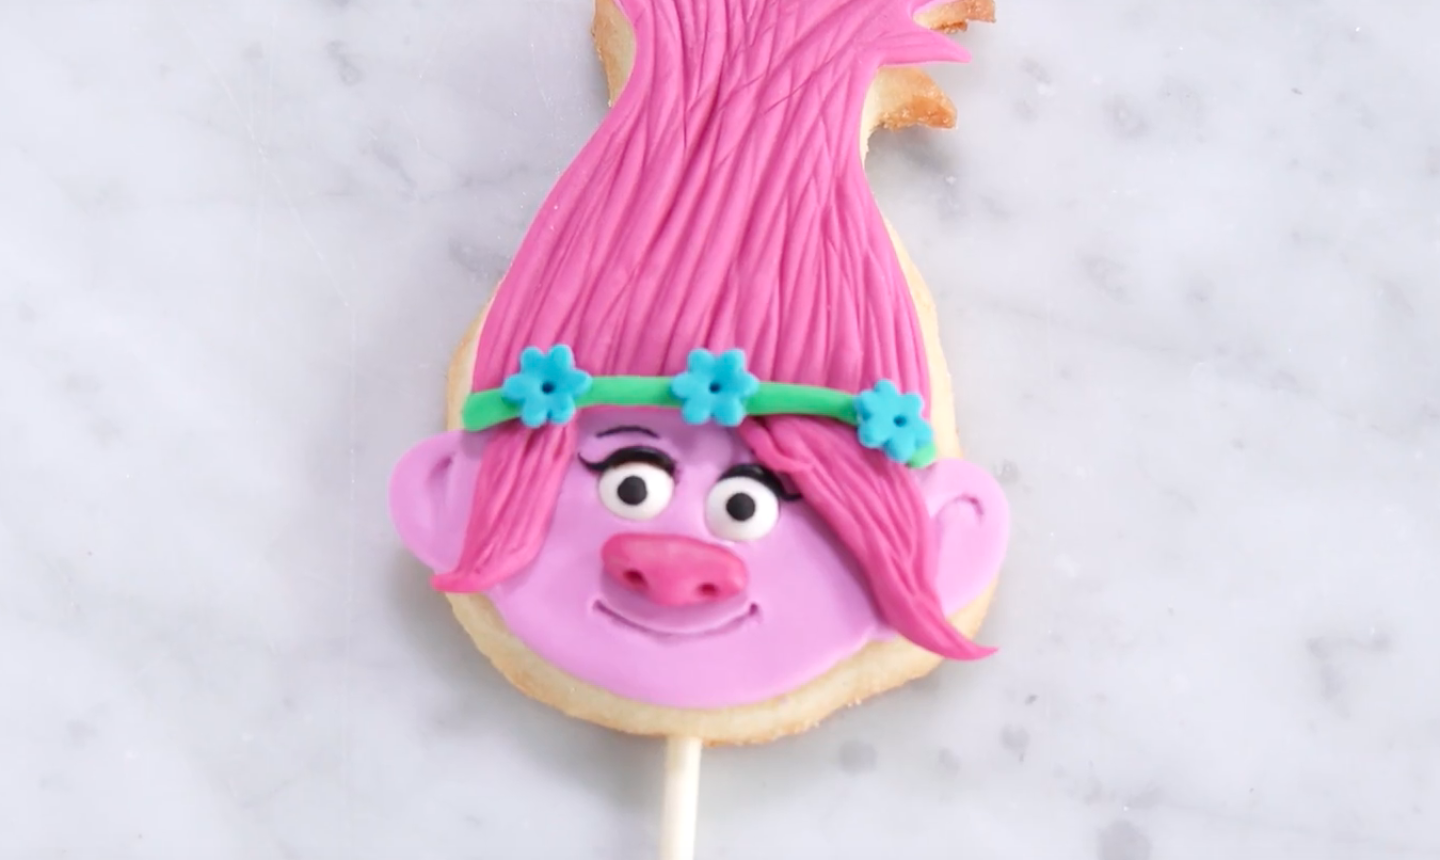 Roll out some blue fondant, following the same kneading-and-cornstarch procedure as before, and use a small cookie cutter to cut out tiny flowers. (You can also shape these freehand if you like.) Secure the flowers across her headband with water.
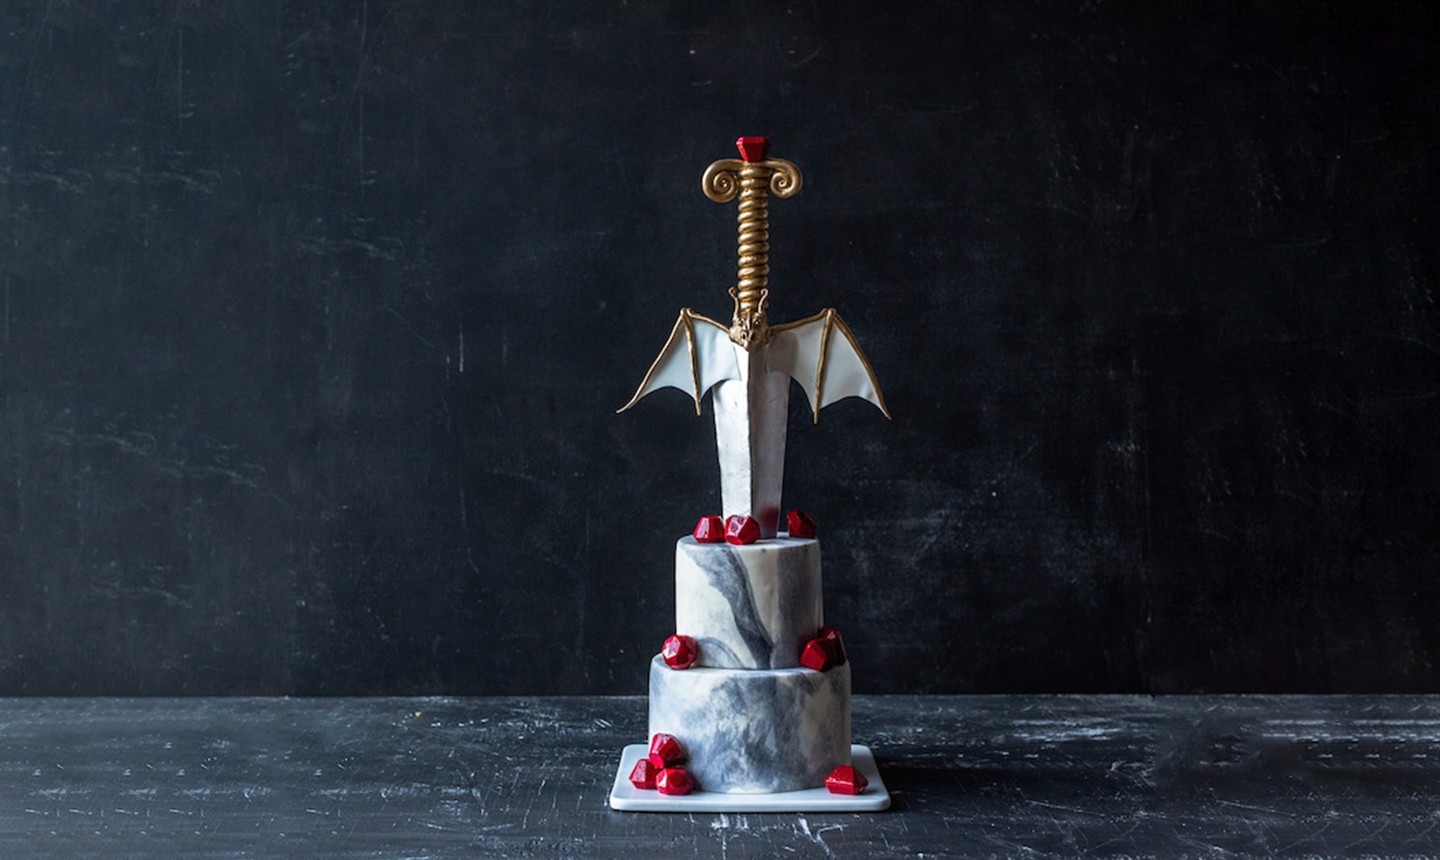 You can count on Joshua John Russell to dream up a show-stopping design! Here, he pays homage to George R.R. Martin with his marbled fondant cake, topped with an unmistakable sharp sword. Watch him make it on Man About Cake !
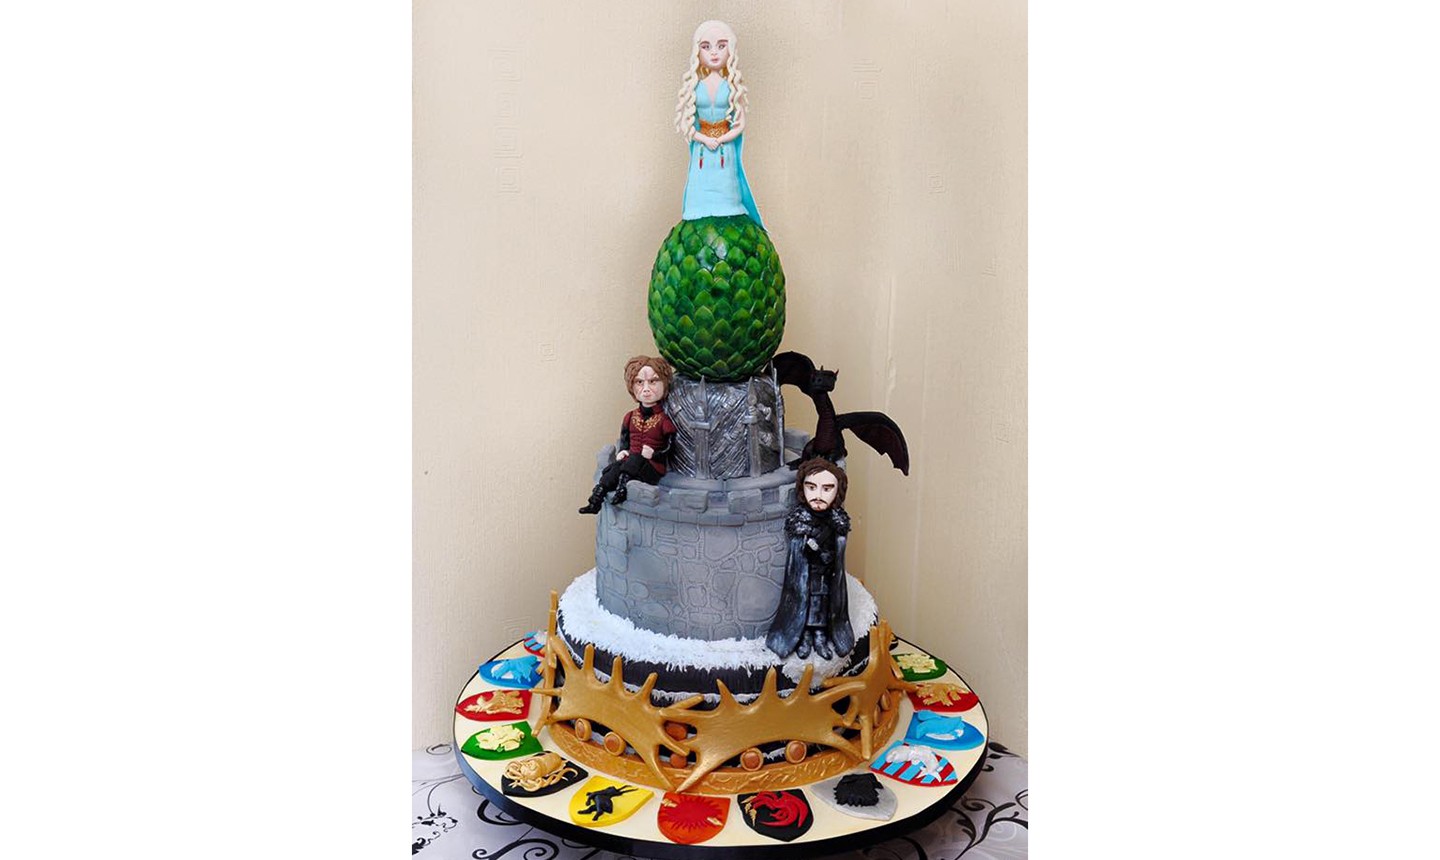 Photo via Mel's Amazing Cakes
U.K.-based Mel's Amazing Cakes used a combo of fondant and gum paste to create some of the show's most popular characters, which are perched atop tiers decorated like a dragon egg, the Iron Throne, castle gates and golden crowns. Royally impressive!
Photo via Mel's Amazing Cakes
U.K.-based Mel's Amazing Cakes used a combo of fondant and gum paste to create some of the show's most popular characters, which are perched atop tiers decorated like a dragon egg, the Iron Throne, castle gates and golden crowns. Royally impressive!
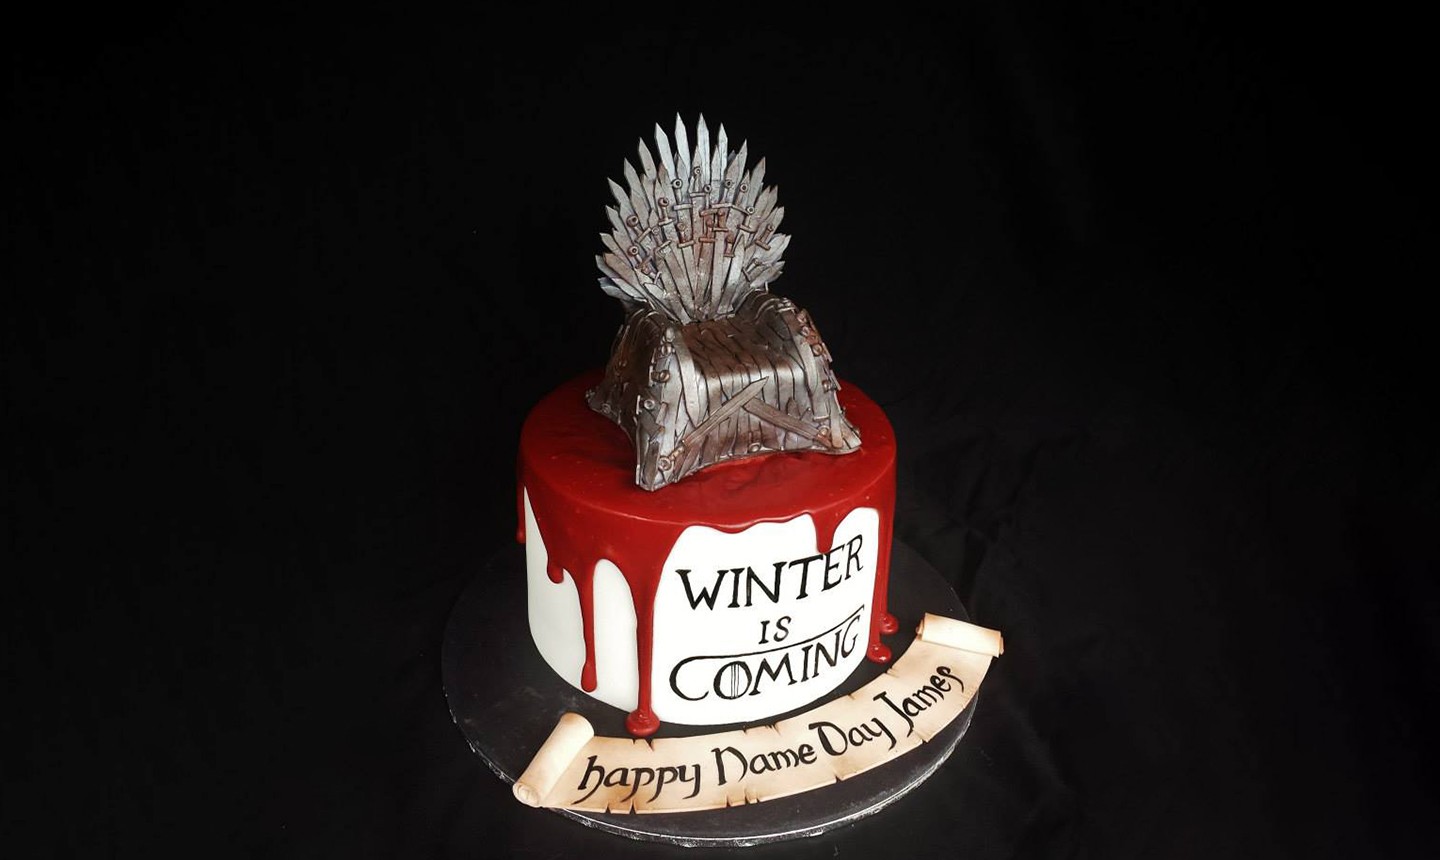 Photo via Cindy's Cake Creations
While it may look like this cake is topped with a metal sculpture, it's actually a completely edible homemade Iron Throne topper. This fondant marvel by Cindy's Cake Creations in Melbourne, Australia, required hundreds of tiny swords sculpted one by one, which "wasn't as fun as it sounds," according to the baker. But if you ask us, it was sooooo worth it.
Photo via Cindy's Cake Creations
While it may look like this cake is topped with a metal sculpture, it's actually a completely edible homemade Iron Throne topper. This fondant marvel by Cindy's Cake Creations in Melbourne, Australia, required hundreds of tiny swords sculpted one by one, which "wasn't as fun as it sounds," according to the baker. But if you ask us, it was sooooo worth it.
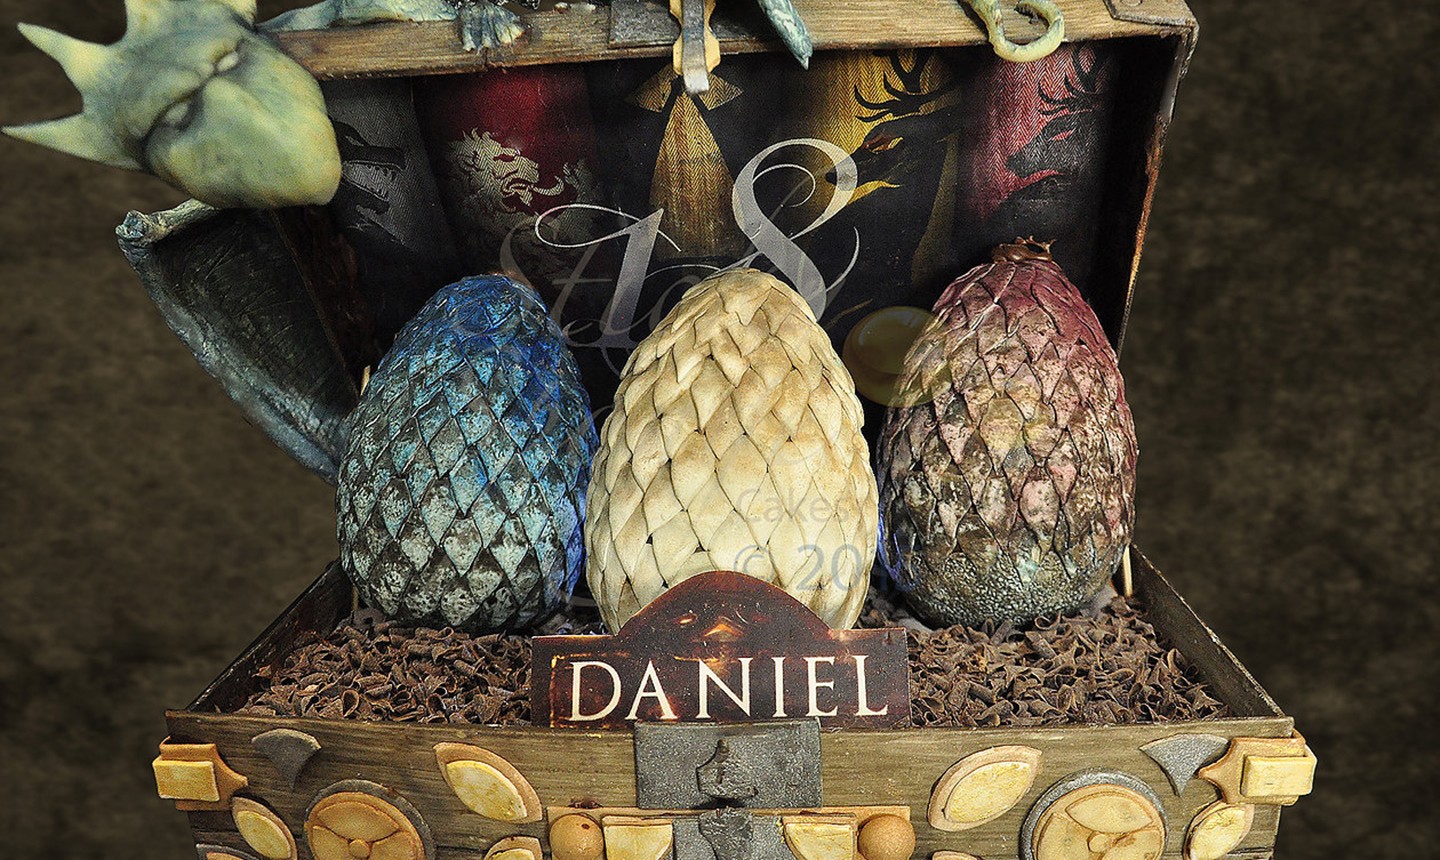 Photo via Sticky Sponge Cake Artists
Believe it or not, aside from a few supports for the lid of the chest and the dragon wings, this creation by Sticky Sponge Cake Artists in the United Kingdom is entirely edible. The sword and chest are made from hardened sugar, and the dragon is sculpted from modeling chocolate. The dragon eggs themselves are made from chocolate, and here's the kicker: they have jelly snakes inside!
Photo via Sticky Sponge Cake Artists
Believe it or not, aside from a few supports for the lid of the chest and the dragon wings, this creation by Sticky Sponge Cake Artists in the United Kingdom is entirely edible. The sword and chest are made from hardened sugar, and the dragon is sculpted from modeling chocolate. The dragon eggs themselves are made from chocolate, and here's the kicker: they have jelly snakes inside!
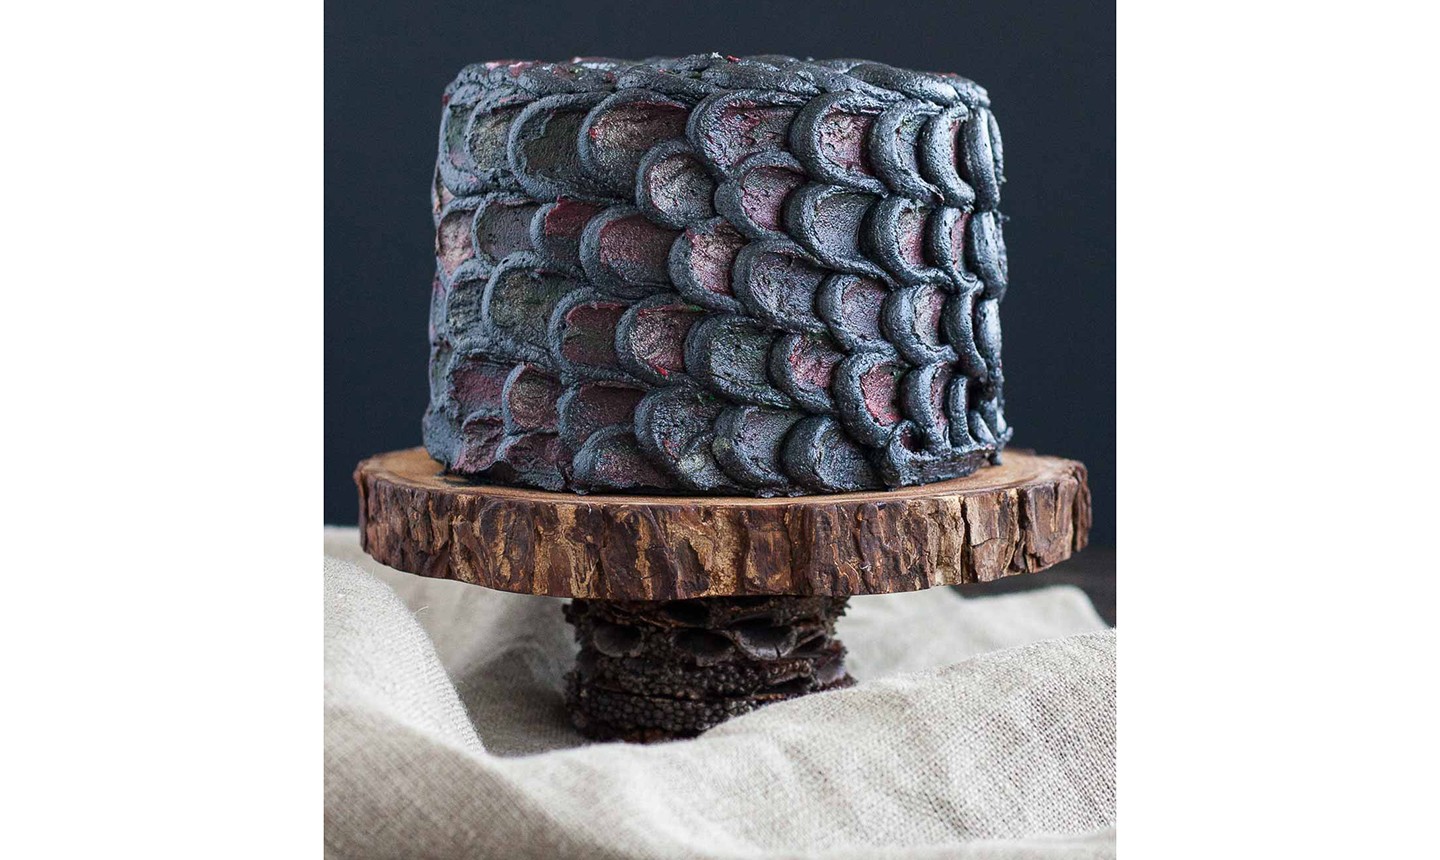 Photo via Liv For Cake
If you're all about buttercream, this is the Game of Thrones cake for you. Blogger Liv For Cake has cleverly concocted a "dragon scale" effect by using creative color mixing and piping techniques. She swirled a little red and green buttercream into her gray, then piped buttercream into dots and spread it slightly, using an offset spatula to get this super-cool texture. A little gold pearl luster dust adds a final magical touch.
Photo via Liv For Cake
If you're all about buttercream, this is the Game of Thrones cake for you. Blogger Liv For Cake has cleverly concocted a "dragon scale" effect by using creative color mixing and piping techniques. She swirled a little red and green buttercream into her gray, then piped buttercream into dots and spread it slightly, using an offset spatula to get this super-cool texture. A little gold pearl luster dust adds a final magical touch.
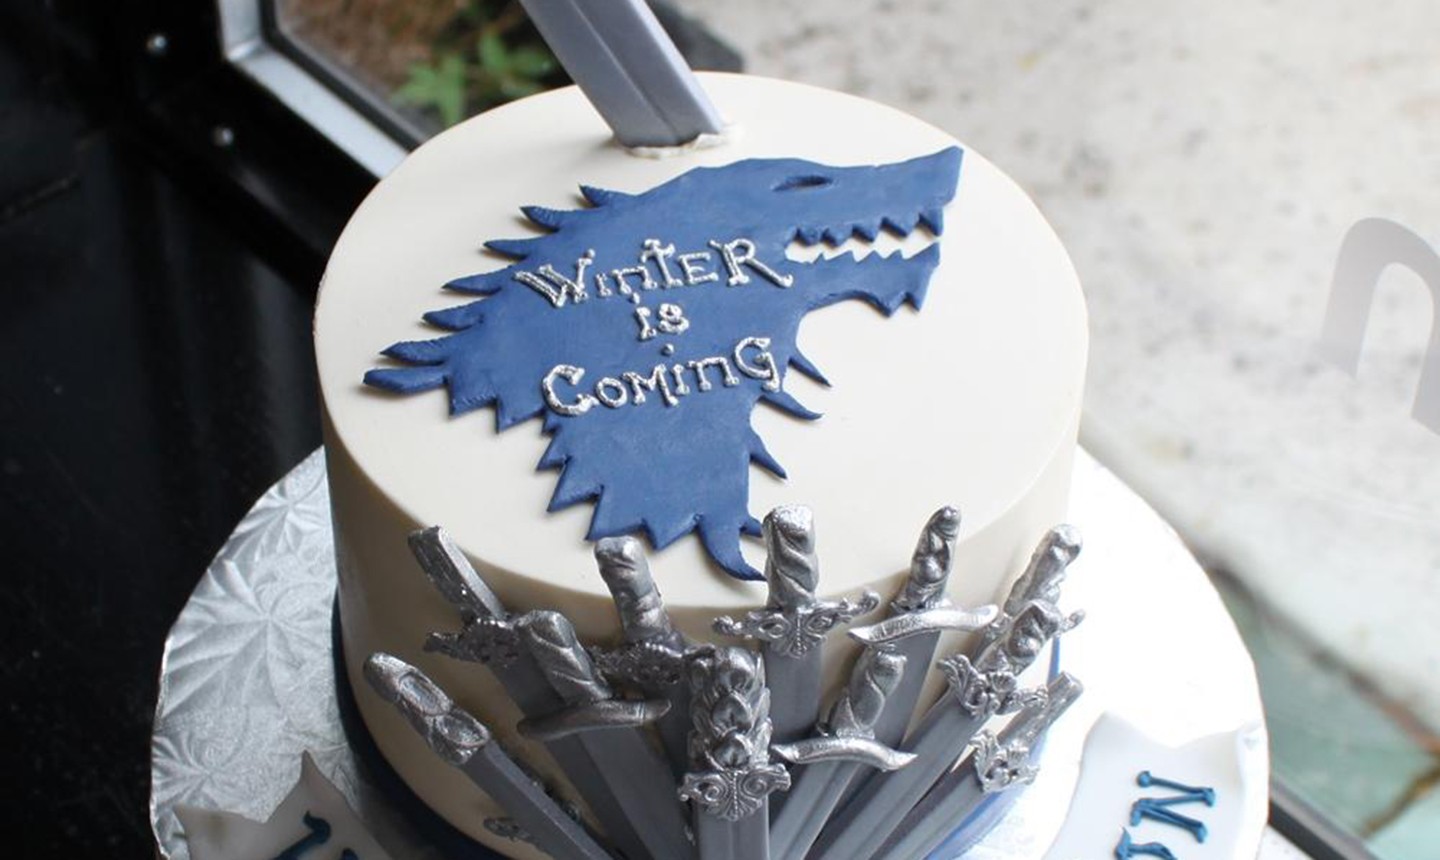 Photo via Whipped Bakeshop
Philadelphia's Whipped Bakeshop started this cake with a perfectly smooth layer of fondant . Then, the snow white canvas was topped with a fondant direwolf emblazoned with the show's tag line "winter is coming," and finished with handmade silvery swords. Fierce!
Photo via Whipped Bakeshop
Philadelphia's Whipped Bakeshop started this cake with a perfectly smooth layer of fondant . Then, the snow white canvas was topped with a fondant direwolf emblazoned with the show's tag line "winter is coming," and finished with handmade silvery swords. Fierce!
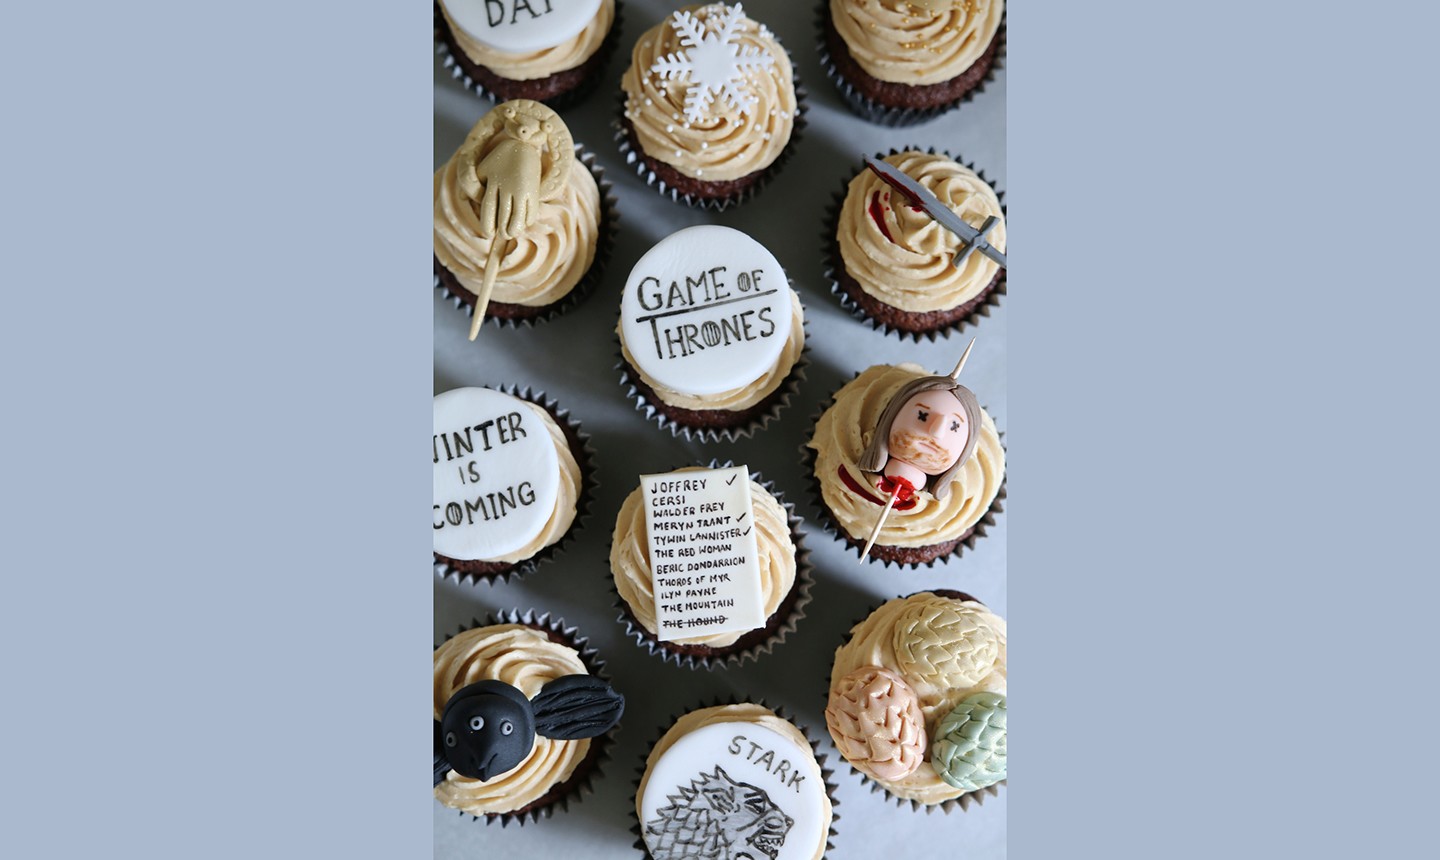 Photo via Afternoon Crumbs
These clever cupcakes by U.K.-based decorator Afternoon Crumbs feature a variety of handmade Game of Thrones toppers, including the Stark family seal, the "Hand of the King" pin motif, Arya Stark's so-called "kill list," dragon eggs and yes, even a disembodied head. The cupcakes themselves are chocolate, filled with salted caramel, and topped with peanut butter frosting, so they definitely taste as good as they look!
Photo via Afternoon Crumbs
These clever cupcakes by U.K.-based decorator Afternoon Crumbs feature a variety of handmade Game of Thrones toppers, including the Stark family seal, the "Hand of the King" pin motif, Arya Stark's so-called "kill list," dragon eggs and yes, even a disembodied head. The cupcakes themselves are chocolate, filled with salted caramel, and topped with peanut butter frosting, so they definitely taste as good as they look!
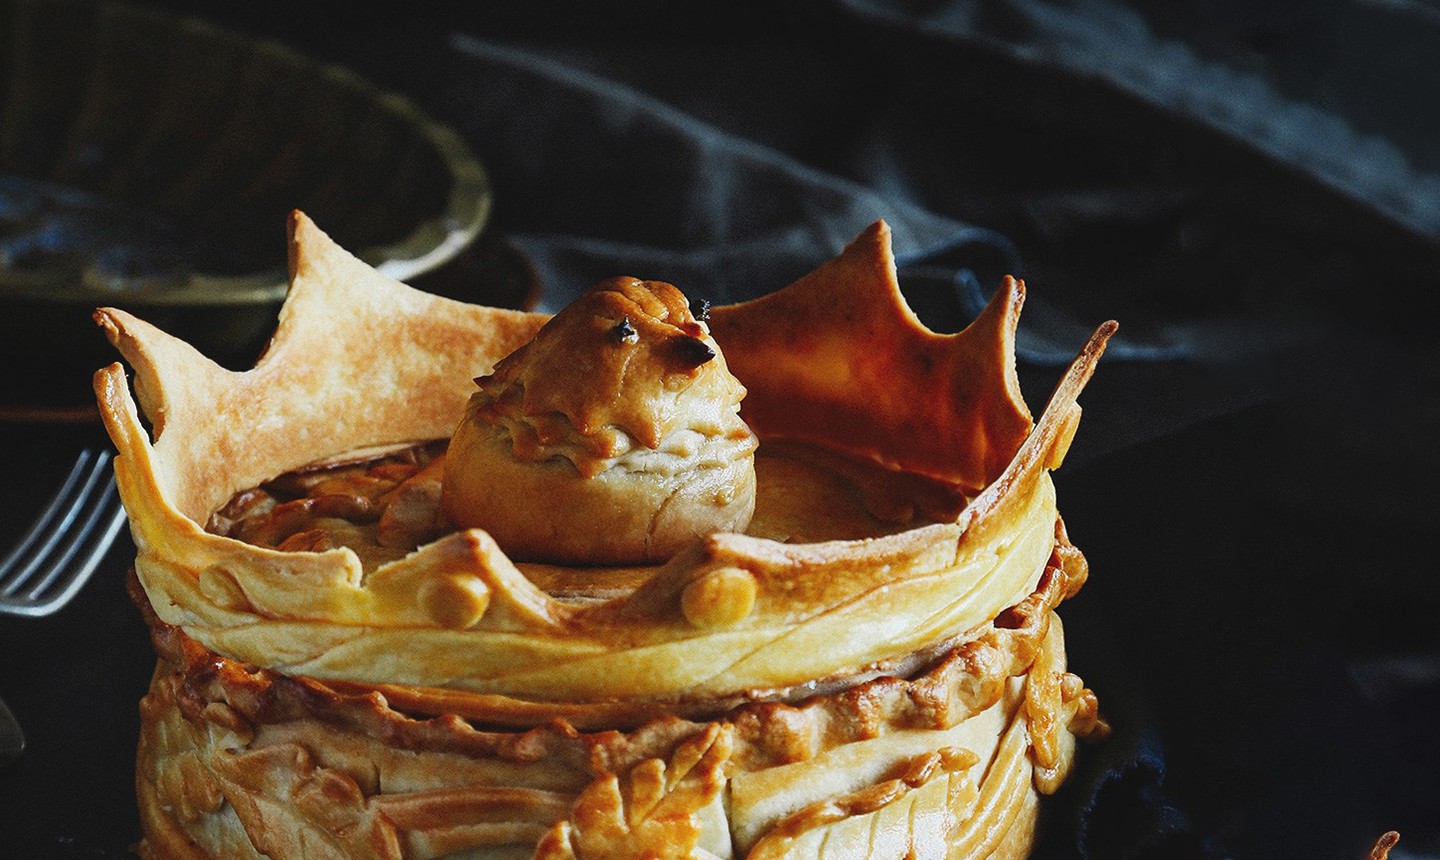 Photo via A Table For Two
Technically this one isn't a cake, but it's too impressive not to share! Loyal fans will remember the ginormous pigeon pie served at Joffrey's wedding. This pie, featured on the Australian blog A Table For Two , is an homage to that pie (but with far more appetizing ingredients). Mushrooms, leeks, chicken stock, cream and spices make up the savory filling, which is wrapped in homemade pastry that's been painstakingly molded to resemble the pigeon pie featured in the show.
Photo via A Table For Two
Technically this one isn't a cake, but it's too impressive not to share! Loyal fans will remember the ginormous pigeon pie served at Joffrey's wedding. This pie, featured on the Australian blog A Table For Two , is an homage to that pie (but with far more appetizing ingredients). Mushrooms, leeks, chicken stock, cream and spices make up the savory filling, which is wrapped in homemade pastry that's been painstakingly molded to resemble the pigeon pie featured in the show.
 TO HELP TAKE THE STRESS OUT OF LARGE ORDERS, WE’RE SHARING A FEW OF OUR MOST HELPFUL COOKIE STORAGE DOS AND DON’TS.
1. Freeze pre-cut shapes
When planning large orders in advance, you can make your dough, pre-cut the shapes and freeze them before baking. Just stack your cut cookies with a piece of waxed or parchment paper between each and pop them in the freezer. Once frozen, wrap each stack of cookies with cling film and then put them back in the freezer to save space.
Remember to label every stack with the flavor, date made and order details. Your frozen cookies will keep for around 3 months.
When you need them, remove from the freezer and place on trays (without the slip of greaseproof paper) and bake straight away.
2. Bake frozen cookie dough
TO HELP TAKE THE STRESS OUT OF LARGE ORDERS, WE’RE SHARING A FEW OF OUR MOST HELPFUL COOKIE STORAGE DOS AND DON’TS.
1. Freeze pre-cut shapes
When planning large orders in advance, you can make your dough, pre-cut the shapes and freeze them before baking. Just stack your cut cookies with a piece of waxed or parchment paper between each and pop them in the freezer. Once frozen, wrap each stack of cookies with cling film and then put them back in the freezer to save space.
Remember to label every stack with the flavor, date made and order details. Your frozen cookies will keep for around 3 months.
When you need them, remove from the freezer and place on trays (without the slip of greaseproof paper) and bake straight away.
2. Bake frozen cookie dough
 If you’ve pre-mixed and frozen your dough, thaw it out by leaving it in a refrigerator for a couple of hours. Then you can roll, cut, chill and bake! Re-freezing the dough will lessen the taste and quality so we wouldn’t recommend putting your dough back in the freezer afterward. To help cut down on waste, why not separate your cookie dough into small balls right after making it?
Tip: We don’t recommend freezing or chilling finished decorated cookies. Water spots can develop on your work, colors can change and water can even eat through your royal icing.
3. Use stackable trays and cooling racks
When your cookies are decorated but still need a little time to dry, trays and cooling racks are really handy. They can take up a lot of space, though, which is why we like stackable or tall bakery-style rack towers. They’re the best way to save a little space if you need to work on other projects.
Tip: Buy a few extra racks to that you can work on other projects while your cookies dry.
4. Keep your cookies away from humidity
If you’ve pre-mixed and frozen your dough, thaw it out by leaving it in a refrigerator for a couple of hours. Then you can roll, cut, chill and bake! Re-freezing the dough will lessen the taste and quality so we wouldn’t recommend putting your dough back in the freezer afterward. To help cut down on waste, why not separate your cookie dough into small balls right after making it?
Tip: We don’t recommend freezing or chilling finished decorated cookies. Water spots can develop on your work, colors can change and water can even eat through your royal icing.
3. Use stackable trays and cooling racks
When your cookies are decorated but still need a little time to dry, trays and cooling racks are really handy. They can take up a lot of space, though, which is why we like stackable or tall bakery-style rack towers. They’re the best way to save a little space if you need to work on other projects.
Tip: Buy a few extra racks to that you can work on other projects while your cookies dry.
4. Keep your cookies away from humidity
 Humidity is not a friend to anything sugar-related. Sugar soaks up moisture in the atmosphere around it. This means that any humidity can lead to tacky, soft or wet-looking treats. Icing can develop a sweaty appearance, break down or end up with unattractive blotches.
If you live in a humid environment or have to deal with wet weather, we recommend getting a dehumidifier. We live on a consistently rainy island (U.K.) and right next to a river. When we work on icing cookies (and sugar flowers) we make sure all the windows in our workroom are shut and we crank up our dehumidifier! You can also turn the heat up a little, which tends to dry out the air indoors.
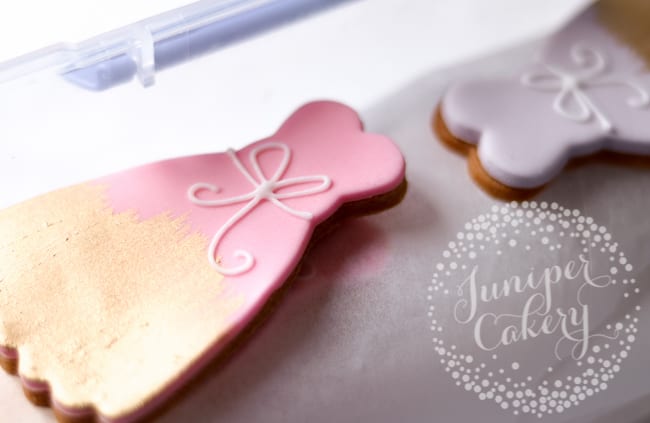
5. Package cookies in cellophane bags
Humidity is not a friend to anything sugar-related. Sugar soaks up moisture in the atmosphere around it. This means that any humidity can lead to tacky, soft or wet-looking treats. Icing can develop a sweaty appearance, break down or end up with unattractive blotches.
If you live in a humid environment or have to deal with wet weather, we recommend getting a dehumidifier. We live on a consistently rainy island (U.K.) and right next to a river. When we work on icing cookies (and sugar flowers) we make sure all the windows in our workroom are shut and we crank up our dehumidifier! You can also turn the heat up a little, which tends to dry out the air indoors.
5. Package cookies in cellophane bags
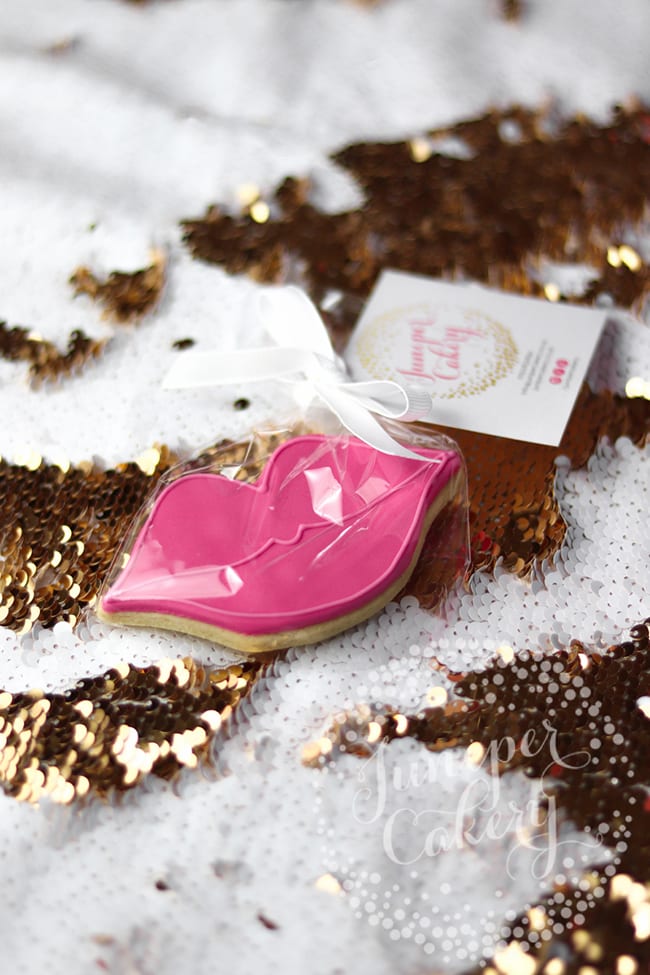 One of the best and most cost-effective packaging solutions for cookies are cellophane bags! We’ve had no problem simply hand tying these (even for larger events). However, for a little extra security, you can lightly seal your bags using a laminator to help make them airtight. You can also bunch up your cellophane and press the center with your laminator before then tying the gather with a pretty bow.
6. Store cookie decorated in advance in airtight containers
One of the best and most cost-effective packaging solutions for cookies are cellophane bags! We’ve had no problem simply hand tying these (even for larger events). However, for a little extra security, you can lightly seal your bags using a laminator to help make them airtight. You can also bunch up your cellophane and press the center with your laminator before then tying the gather with a pretty bow.
6. Store cookie decorated in advance in airtight containers
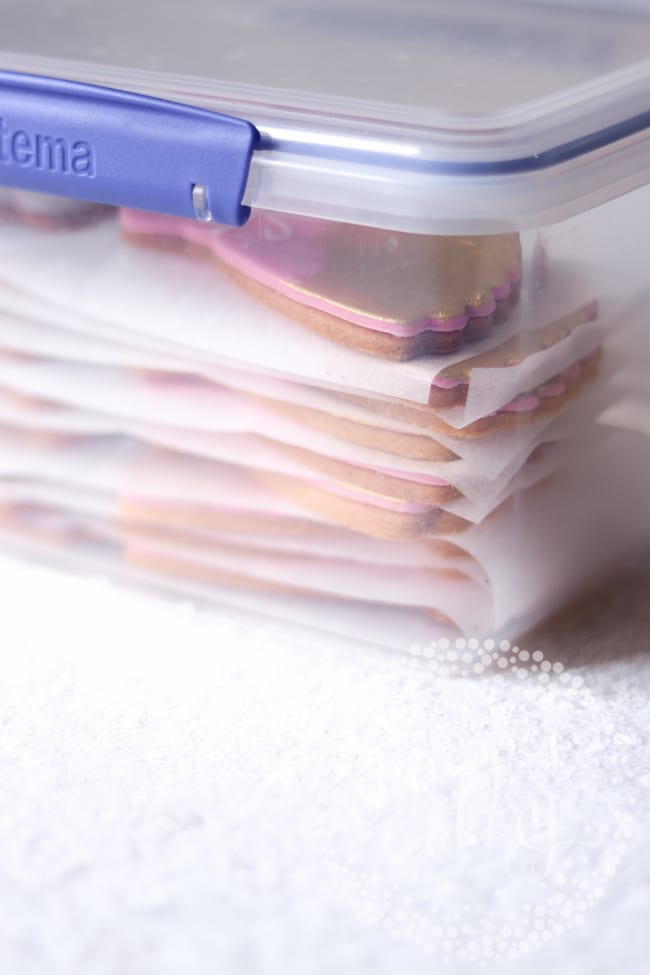 Decorated cookies will keep in an airtight container for up to one week. You don’t want to work too much farther in advance, though.
To store your decorated cookies, place the cookies right side up in one flat layer in your container. Then, place a sheet of waxed paper or parchment paper over the cookies before placing another layer of cookies in the container. This helps avoid dents, mark or chips.
Make sure you use good quality airtight containers! Cheap ones can still let in moisture, which will ruin your cookies. Once boxed up, keep in a cool dark spot like a cabinet or cupboard. Storing your cookies near any light source can fade or warp your colors. [ ... ]
Decorated cookies will keep in an airtight container for up to one week. You don’t want to work too much farther in advance, though.
To store your decorated cookies, place the cookies right side up in one flat layer in your container. Then, place a sheet of waxed paper or parchment paper over the cookies before placing another layer of cookies in the container. This helps avoid dents, mark or chips.
Make sure you use good quality airtight containers! Cheap ones can still let in moisture, which will ruin your cookies. Once boxed up, keep in a cool dark spot like a cabinet or cupboard. Storing your cookies near any light source can fade or warp your colors. [ ... ] 
 Airtight is right for soft cookies!
Drop cookies and the like should be kept in an airtight container, either in a single layer for iced or decorated cookies, or in layers separated by a sheet of parchment paper for cookies with no icing.
Here's a fun trick: Tuck a half slice of white bread in the container with the cookies. The cookies will absorb moisture from the bread, keeping them moist and soft. Nifty!
Be careful about storing different types of cookies together because they can absorb each other's flavors. Sometimes this won't matter much (say, with regular shortbread and browned-butter shortbread). But if you store peppermint cookies with pumpkin cookies, the results could be... unusual.
Let crispy cookies breathe.
For gingersnaps, wafer cookies and others where your goal is to retain crunch, use a container that lets some air in. A traditional cookie jar with a loose lid works, and so does an airtight container with the lid not totally sealed. Or try a bag with small holes.
Airtight is right for soft cookies!
Drop cookies and the like should be kept in an airtight container, either in a single layer for iced or decorated cookies, or in layers separated by a sheet of parchment paper for cookies with no icing.
Here's a fun trick: Tuck a half slice of white bread in the container with the cookies. The cookies will absorb moisture from the bread, keeping them moist and soft. Nifty!
Be careful about storing different types of cookies together because they can absorb each other's flavors. Sometimes this won't matter much (say, with regular shortbread and browned-butter shortbread). But if you store peppermint cookies with pumpkin cookies, the results could be... unusual.
Let crispy cookies breathe.
For gingersnaps, wafer cookies and others where your goal is to retain crunch, use a container that lets some air in. A traditional cookie jar with a loose lid works, and so does an airtight container with the lid not totally sealed. Or try a bag with small holes.
 [ ... ]